


My girlfriend was going away for a few weeks, but where she was going, there was no easily accessible Internet. She works mostly on the web, so it was imperative that she have a decent Internet connection during her travels. So, tethering her phone was the only real possibility.
The phone in question is an HTC DROID ERIS, which some would say is impossible. After scouring the web for tutorials on tethering the Eris, there seemed to be 3 options:
 Use an application that requires a ROOTED phone. One example is Android Wi-Fi Tether, which is FREE. For those who do NOT wish to accidentally brick their phone and don't want to break their TOS (terms of service) with their service provider, this option is a last resort. If you have no idea what a "rooted" phone is, or what "brick" refers to, then you should just ignore this option entirely. It never existed.
 Use Proxoid, Android SDK & Terminal. If you know what a proxy server is, and know a little bit about command line using Terminal, this is a viable option for you. Proxoid is FREE and makes your Android device a proxy server that your computer uses to make Internet requests. This is less complicated that "rooting" your Eris, but is still more complicated than...
- Use PdaNet.PdaNet is NOT FREE, and requires you to download PdaNet to your phone and to your computer. It costs $30 for full functionality, but there is a free version that gives you a 14-day trial. If you try this option, make sure you try the free version first to make sure it will even work for your phone. This is the easiest of the 3 options and you don't need to be a techie to do it, but it seems not to work for the HTC Eris.

These 3 options seem to work best using Windows, but it was a little harder finding success for those using Mac operating systems, and we both have Mac computers.
 We had no desire to "root" the Eris, which meant Option 1 was nixed. And we are not Android pros, nor have we ever really messed with Terminal on our Macs, so we skipped Option 2. Which left Option 3— PdaNet. After about 2 hours and a lot of promise, it turned out to be an impossible task. I thought that maybe, just maybe, even though I read countless comments about the Eris not working with PdaNet, that I could get it up and running. I tried everything— absolutely everything to get PdaNet to work. Alas, it wasn't meant to be.
So, we resorted to Option 2. Surprisingly, it wasn't all that hard to set up. And this is how you do it.
Note
- I used an HTC Droid Eris running Android 2.1 firmware, along with Mac OS X 10.6.4 (Snow Leopard) on a MacBook Pro.
Download Proxoid to the Eris
This is the simplest step you'll encounter. Just make sure your HTC Eris is turned on and download Proxoid from the Android Market.
- Select Market from your Home Screen.
- Press the Search icon.
- Enter Proxoid and press the Search icon again.
- One result should show. Select it.
- Press Install and follow the instructions.

Once Proxoid has downloaded, it should show up in your Applications folder.
Download the Android SDK on Your Mac
This is another slightly easy step. Go the Android Developers website and click on the Android SDK for Mac OS X (Intel) link.
Ignore everything else on that page, because I read through it thinking I had to follow the "quick start" directions, but only got more confused. The only thing you need to know is that you need Mac OS X 10.5.8 or later using x86, which basically means any Mac computer with an Intel processor (sorry PowerPCs).

A download box will appear. Press OK to download the ZIP file to your computer.

Un-ZIP the Downloaded File
When the download finishes, find the saved file on your computer, which should be named android-sdk_r06-mac_86.zip. If the file hadn't unzipped automatically (mine does), unzip it and wait for the folder to appear nearby, which should be aptly named android-sdk_r06-mac_86.

You can delete the ZIP file if you want. Then you can rename the zipped folder to whatever you want, if you so desire. But the best option is just to name it Android. Then you need to move it somewhere on your user name.
- Go to Macintosh HD in Finder.
- Select Users. Choose your User name, not Shared.
- Drag the Android folder to any place you want, like Documents or Applications. I used Applications.
Add SDK's Tools Location to Your PATH Directory
To speed up workflow in Terminal, you'll want to add the location of the SDK's primary tools directory to your system PATH. This is optional, but recommended.
What does this mean? I'm not sure, but I did it anyway. I found great information on how to do this on a thread at the Android Beginners Google Group.
Open up Terminal, which can be found in Applications in the Utilities folder. You can also search for "Terminal" in Spotlight. A terminal window will open and it will say something like:
Last login: Sat Aug 7 20:28:29 on console
Your Computer's Name:~ username$
The last line that looks like "Your Computer's Name:~ username$" is called the prompt. It will appear after every command you enter. You also type your commands here. It consists of your computer name, your current directory, and your short username. When you start Terminal, "~" is your current directory, which is short for your home directory (/Users/Your username).
You need to create a .bash_profile, but you might already have one, so:
- Type "ls -a" (no quotes) and press Enter. If you see .bash_profile listed in your home folder, you're good. If not, you'll need to create one.
- Type "touch .bash_profile" (no quotes) and press Enter. This will create a blank file if there is none.
- Type "open -e .bash_profile" (no quotes). This will open it in TextEdit. Add the following line into the blank TextEdit page:
- "export PATH=${PATH}:*<your_sdk_dir>*/tools" (no quotes). You need to change *<your_sdk_dir>* to state the full path to the Android SDK folder. If the folder is in your Applications folder (like mine), it would like something like this: export PATH=${PATH}:/Users/YourUserName/Applications/Android/tools.
- Save the TextEdit file and quit the application.
Create a Bash File in Terminal
Now you need to create a specific bash file. In Terminal:
- Type "nano .bash_profile" (no quotes) and press Enter. A blank file will open in Terminal called "File: .bash_profile".
- Type "export PATH=${PATH}:/android/tools", then quit and save the file by pressing Control + X (Exit). It will ask you if you want to "Save modified buffer?" and you do, so simply press Y for Yes.
- Close Terminal and restart your computer.
Activate USB Debugging on the Eris
Once your computer has restarted, it's time to focus on your HTC Eris. You need to make sure USB Debugging is checked on your Eris before you can connect it to your computer with the provided USB cable (everyone should have one).
- Make sure your phone is turned on and unlock your screen. Press the Applications button shortcut in the bottom left of your Home Screen and find Settings. You can also do this by pressing the "menu" button on your Android device and select the Settings option from the list that appears.
- Select Settings, then Applications, then Development, and make sure USB Debugging is turned on with a green check mark beside it.

Open Proxoid and Connect the Eris
With USB Debugging enabled, open up the Proxoid application on your phone and connect it via USB to your computer.
- Make sure your phone is turned on and unlock your screen. Press the Applications button shortcut in the bottom left of your Home Screen and find Proxoid. Open it.
- Make sure "Start/Stop Proxoid" is turned on. If there is no green check mark, select it until you see one and it says "Proxy currently on".
- Next, connect your Eris to your Mac computer via the USB cable. Once you connect it, the Connect To PC box will pop up. Select "Charge Only" and press Done.

Set Up the Proxy in Terminal
With the Eris connected and Proxoid turned on, open up Terminal and:
- Type "cd android" (no quotes) and press Enter.
- Type "cd tools" (no quotes) and press Enter.
- Type "adb forward tcp:8080 tcp:8080" (no quotes) and press Enter.
It should end up looking like this:

Set Up Your Web Browser's Proxy Settings
You'll need to make sure your proxy settings for your browser are set up correctly. I'm using Firefox in this example.
Warnings
- Make sure your Airport on your Mac is turned OFF.
- Open up Firefox and open Preferences.
- Select the Advanced tab.
- Choose Network and click Settings.
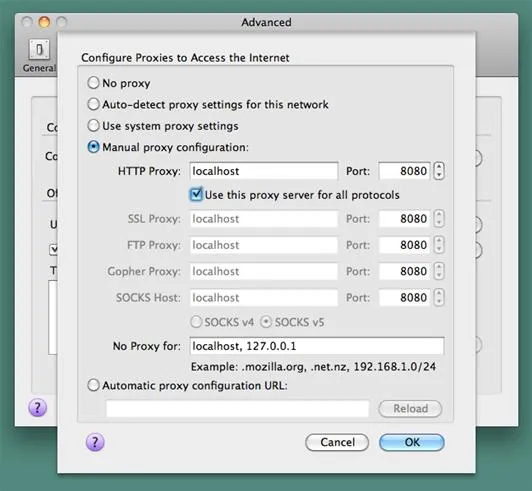
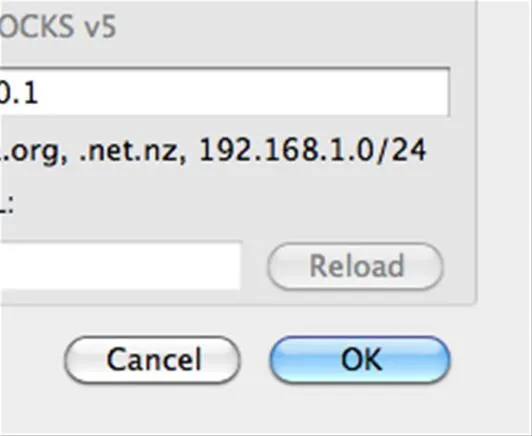
- More than likely, you have "Use system proxy settings" selected. Change it to "Manual proxy configuration" and in the HTTP Proxy box, input localhost, and in the Port box, 8080. If you want to access secure websites for which you need to log in to, make sure the "Use this proxy server for all protocols" is checked. This will allow you to view websites that have "https" and not just "http".
- Press OK and close Preferences.
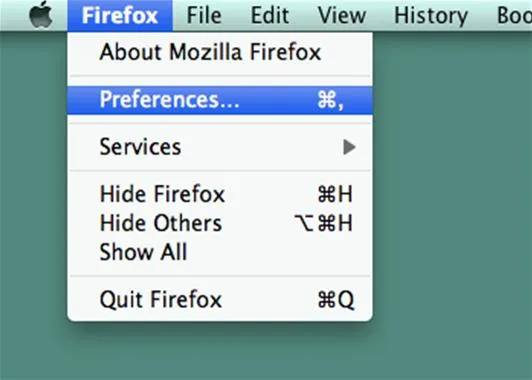
1. Open up Firefox and open Preferences.
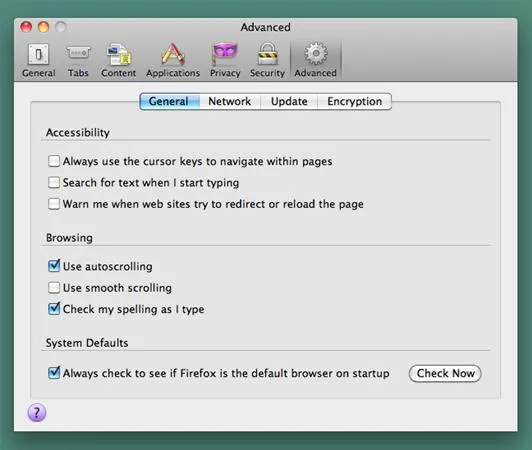
2. Select the Advanced tab.
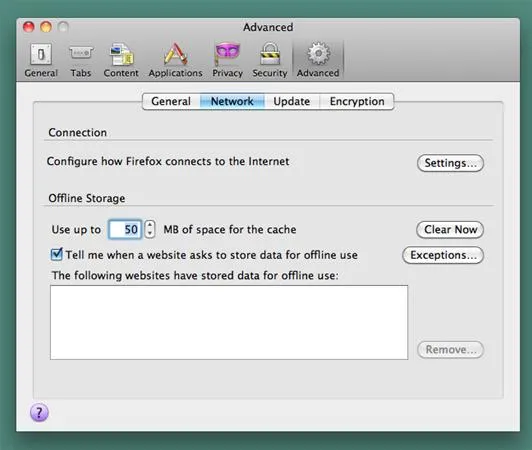
3. Choose Network and click Settings.
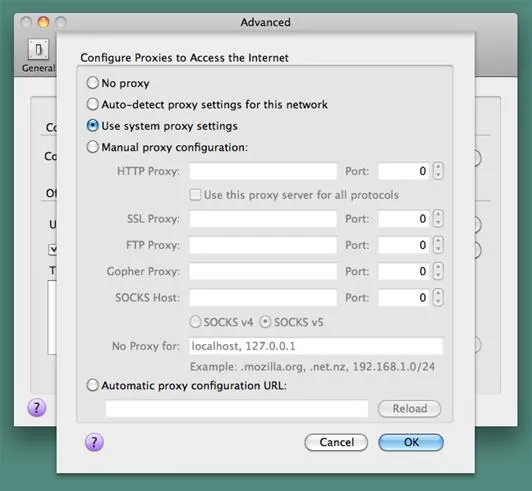
4. More than likely, you have "Use system proxy settings" selected.
4. Change to "Manual" and add "localhost" and "8080" for all protocols.
5. Press OK and close Preferences.
1. Open up Firefox and open Preferences.
2. Select the Advanced tab.
3. Choose Network and click Settings.
4. More than likely, you have "Use system proxy settings" selected.
4. Change to "Manual" and add "localhost" and "8080" for all protocols.
5. Press OK and close Preferences.
Browse the Web!
That's it. Once you've completed all of this, you should be able to browse the web on your computer tethered to your Droid Eris.

Tips
- When not using your Eris for Internet on your Mac computer, make sure Proxoid is OFF on your phone to save power consumption.
- Revert your Firefox (or other browser) settings to "Use system proxy settings". Otherwise, you will not be able to connect to local WiFi networks.
- Whenever you want to tether your Eris phone again for Internet on your Mac, just repeat Steps 7 through 10. You don't need to redo Step 6, unless you turned USB Debugging off.
- The "Manual proxy configuration" in Firefox should be remembered, so you only have to select that option, not report all the proxy settings again.


Comments
Be the first, drop a comment!