


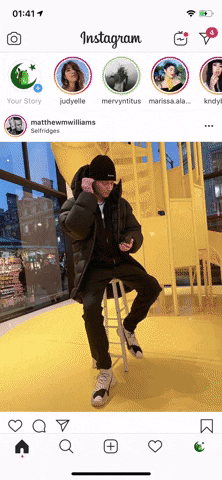
There's a new trend on Instagram Stories: People are making viral AR filters where images of popular characters from TV shows, movies, and other mediums shuffle above your head until one sticks. The filters range from Disney and Pokémon characters to Harry Potter and Friends, but you're not limited to just that because you can create your own "which are you?" filter.
In 2017, Facebook released Spark AR Studio, an augmented reality platform for both Mac and Windows that makes it easy to create AR effects for both Facebook and Instagram apps on iOS and Android. You don't need to know how to code — or be even that technically-savvy — to build your own AR filter.
We'll show you how to make one of those viral random character generator filters for Instagram Stories using your own set of images. At the same time, you'll learn the basics of creating an AR filter overall, in case you want to experiment with a different type of AR filter for the Story camera that you can share with others.
Find & Download Your Assets
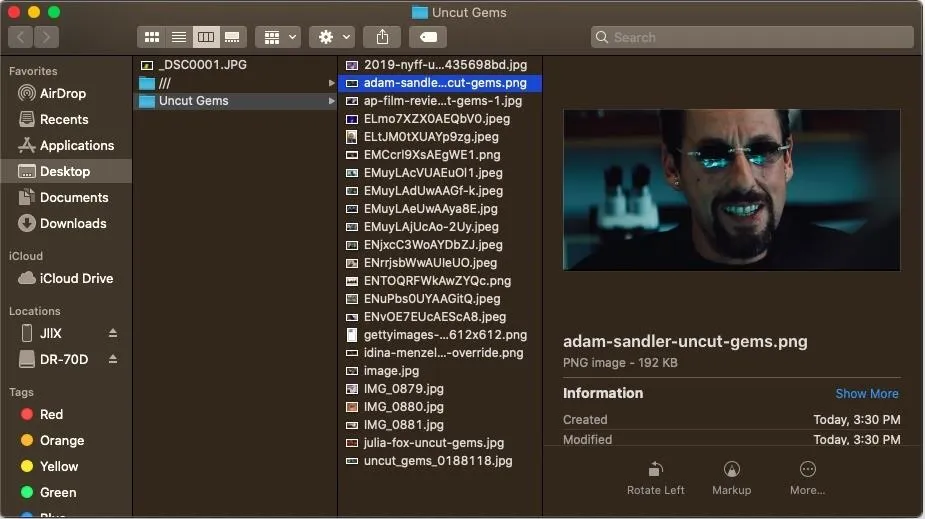
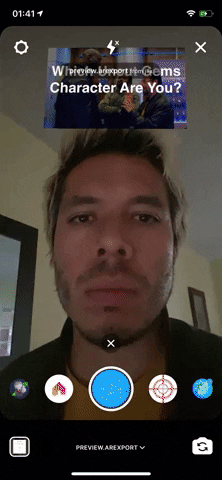
You're going to create a character generator filter, so you'll need images of characters or people. I'll be creating a "Which Uncut Gems Character Are You?" filter, so I'll be using a few dozen images from the movie Uncut Gems, as well as an introductory image which will have the title of the filter. Save the pictures somewhere where they're easy to locate on your computer because you'll need to upload them to Spark AR Studio later.
Install Spark AR on Your Computer
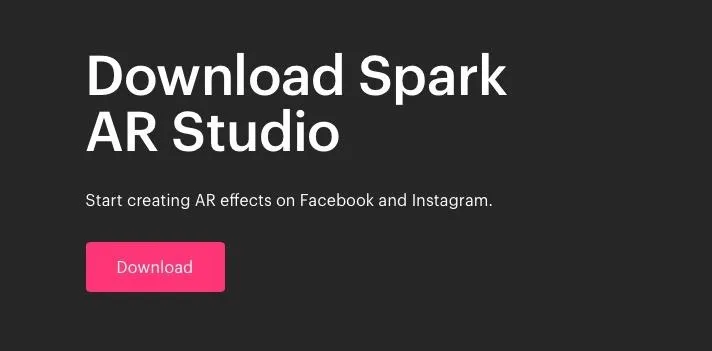
You can download Spark AR Studio, the tool used to create filters, for free on your Mac or Windows. (We'll be using the Mac version throughout the guide, but it's the same process.) Read through the terms and conditions because, among other things, "your use of Spark AR Studio is subject to and you agree to the Facebook Platform Policy and the Facebook Terms of Service."
- Download Link: Spark AR Studio (free)
Start a New Project
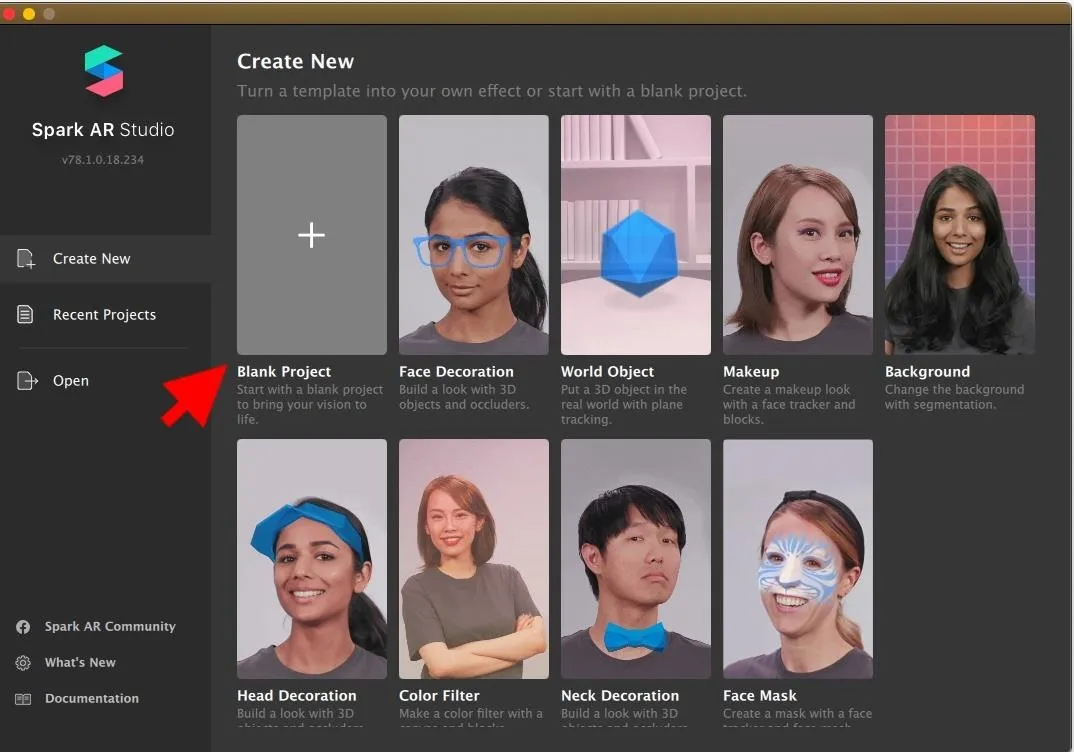
After installing Spark AR Studio on your computer, you'll get to the homepage, where you can either start a new project or begin with an existing template. For this guide, we'll be starting from scratch, but I do encourage you to play around with the templates (world objects, color filters, makeup, etc.) in case you want to create a different type of Instagram Stories filter.
To start a new project, click on "Create New" in the sidebar, then on "Blank Project."
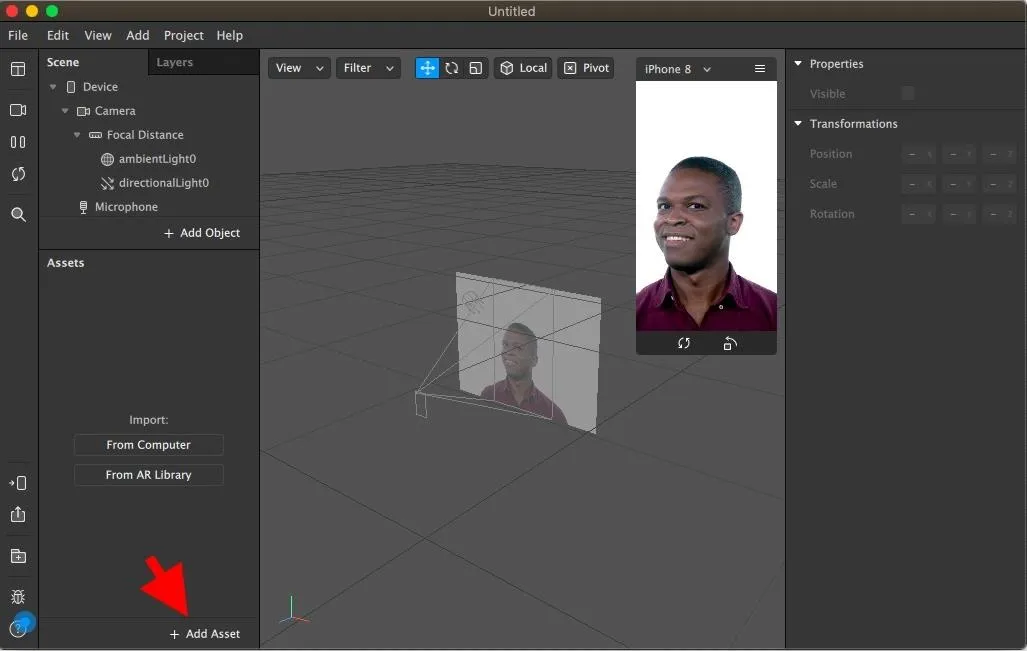
Import Your Image Gallery Assets as an Animation Sequence
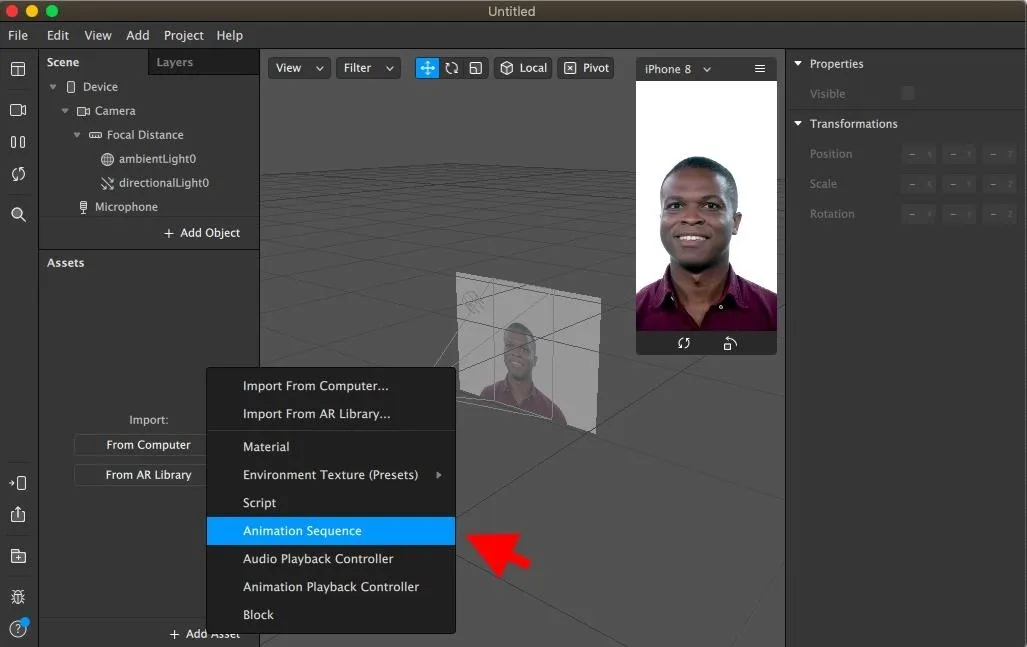
To start your filter, you must import your image gallery assets, which are the images you downloaded on your computer in the first step (minus the intro image). Click on "+ Add Asset" in the Assets panel to create an animation sequence (because the photos are animated in the filter).
Click on "Animation Sequence" from the options that appear in the black menu.
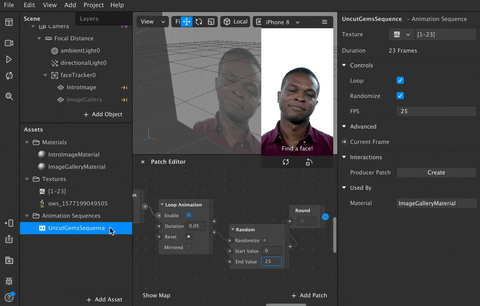
Give the Animation Sequence a name (I named mine "UncutGemsSequence"), then click on "Choose File" next to Texture in the Inspector, which is the window where you can make changes to assets and objects.
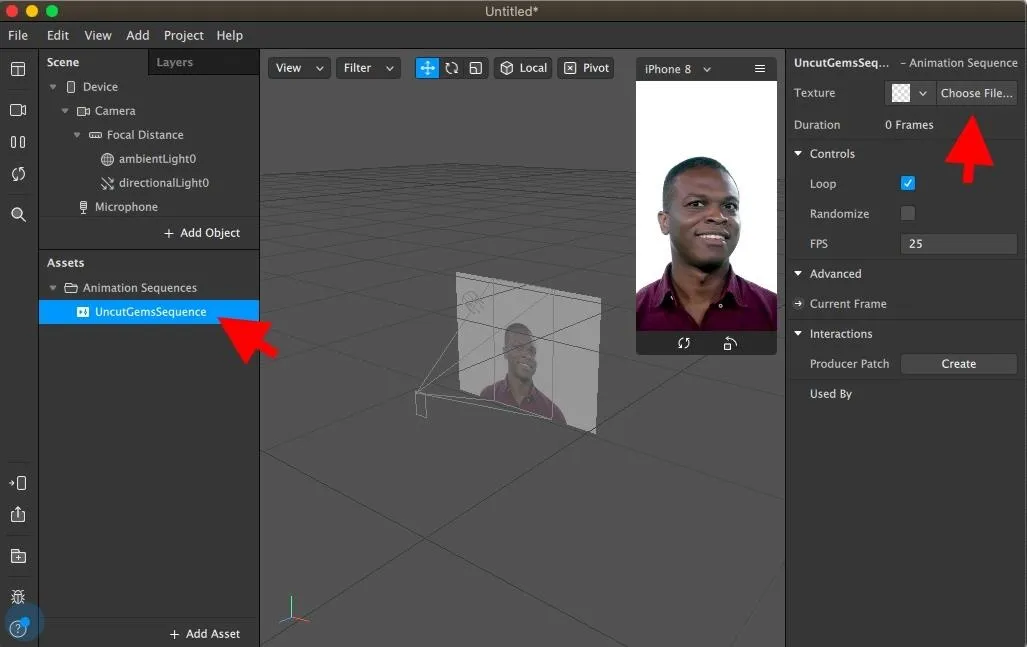
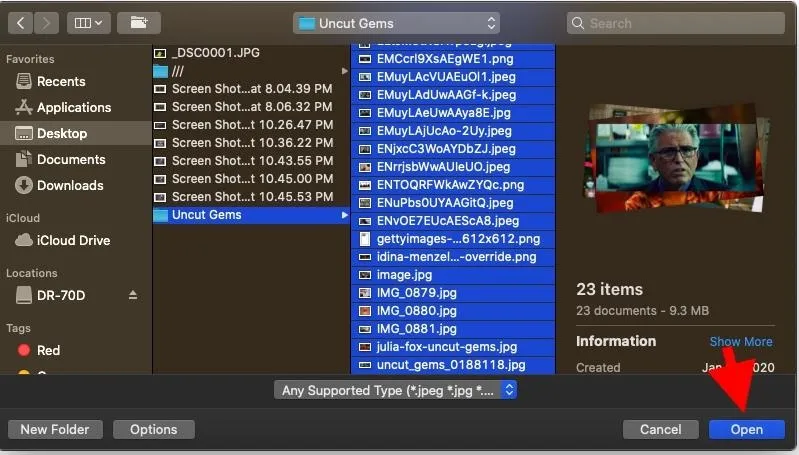
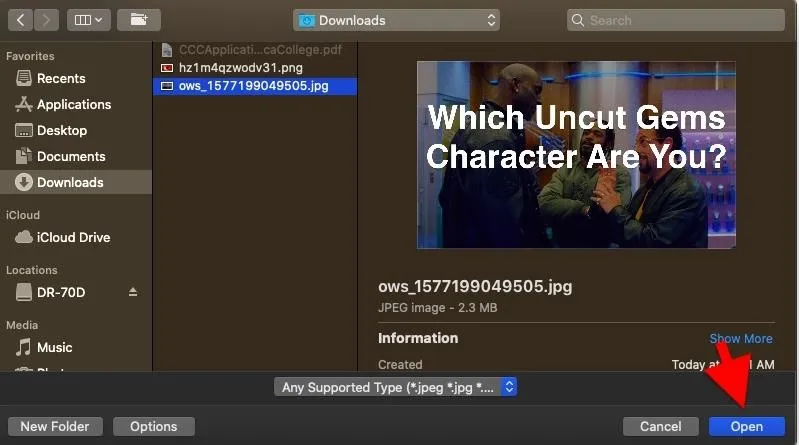
Find your assets/images and select the ones you want to add to your gallery. Click on "Open" and wait several seconds for all of the pictures to upload, which could take a bit if you have high-quality images or just have more than a handful.
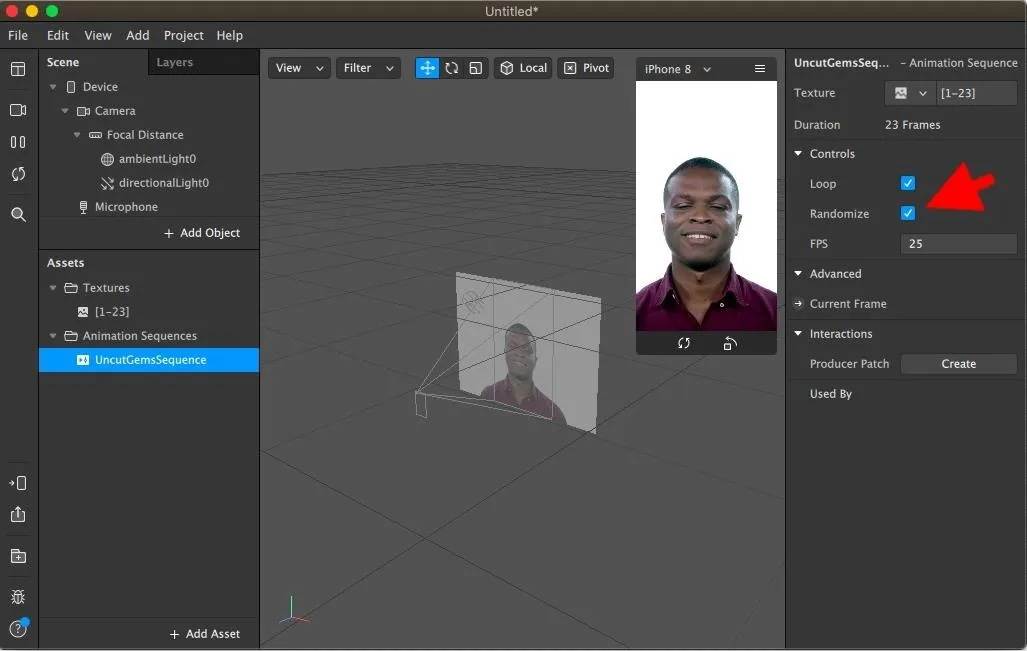
It will create an Animation Texture file, which will be called [1–#] (depending on how many images you import). In the Inspector, click the box next to "Randomize" under Controls, which will randomize your image gallery as it shuffles in the filter.
Add a Face Tracker & First Plane
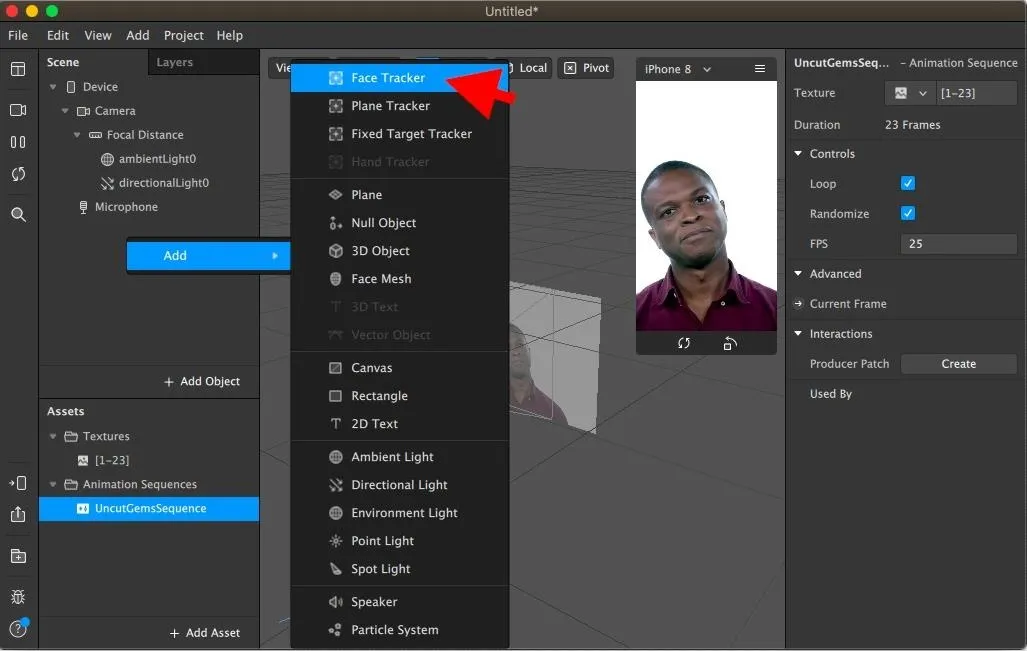
You want the filter to be tracking the face of whoever is using it, so you must add the built-in feature into your project. To do so, right-click anywhere in the empty space in the Scene panel (in the top left), click "Add," and then select "Face Tracker."
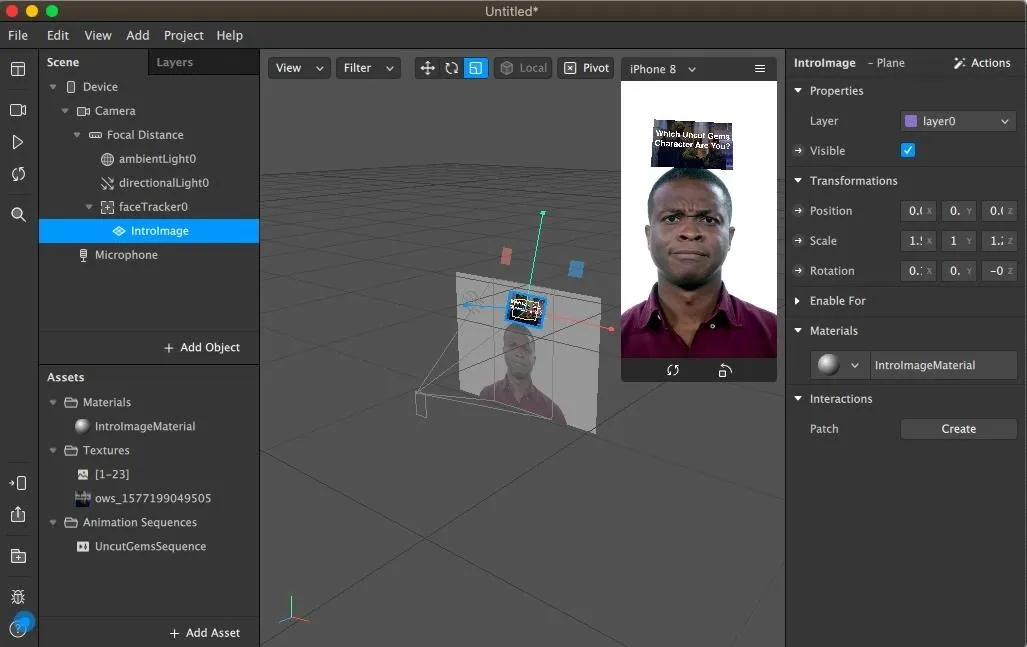
Next, you must add a plane. Right-click on the newly-created "faceTracker0," click "Add," and then select "Plane" so that it is created as a child to the face tracker scene.
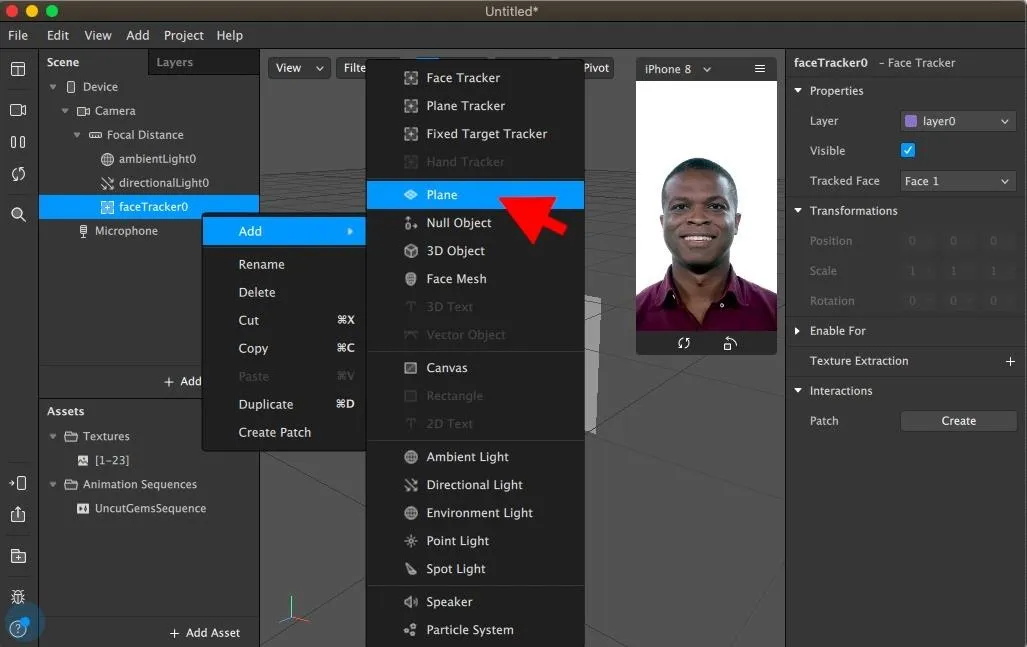
Name it "IntroImage." You can see a preview of the plane, and how it would look in the filter, in the Viewport (larger panel) and Simulator (smaller panel) in the middle of Spark AR Studio.
Adjust the Plane
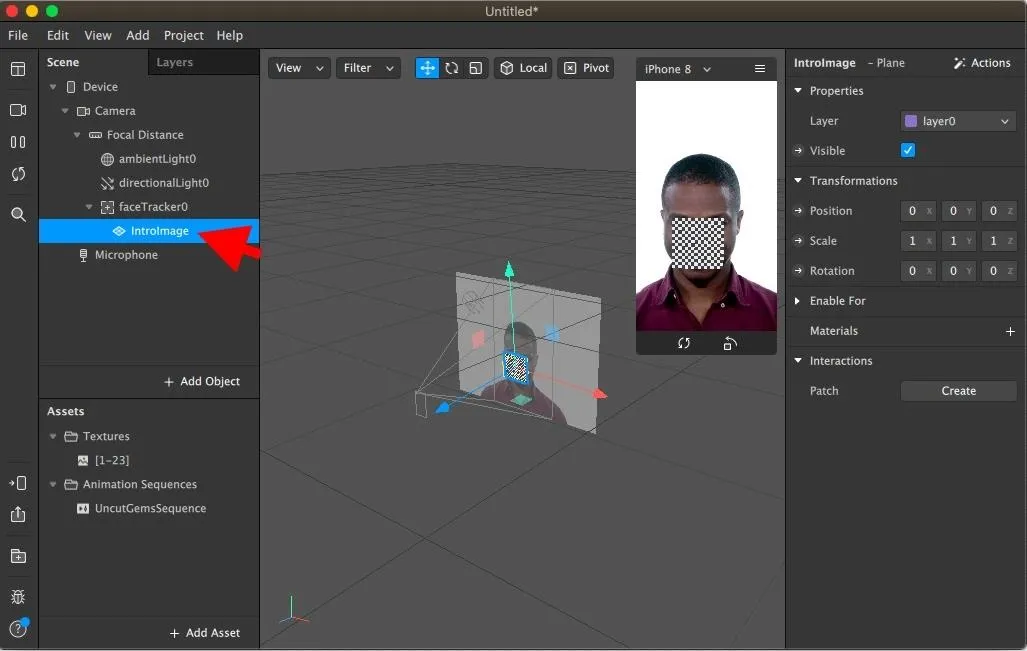
If you want the filter to be similar to the viral ones, you must place the face tracker plane near the top of the forehead or above the head. To do so, click on the IntroImage plane, then hit the pause button in the far left toolbar. It will stop the Simulator from moving, making it easier to adjust the face tracker.
Now, click-and-hold on the green arrow pointing up in the Viewport; move the plane near the top of the head. There is no right way to do this, but you want it high enough so that we can see the face. Use the other arrows to move it left or right, if needed.
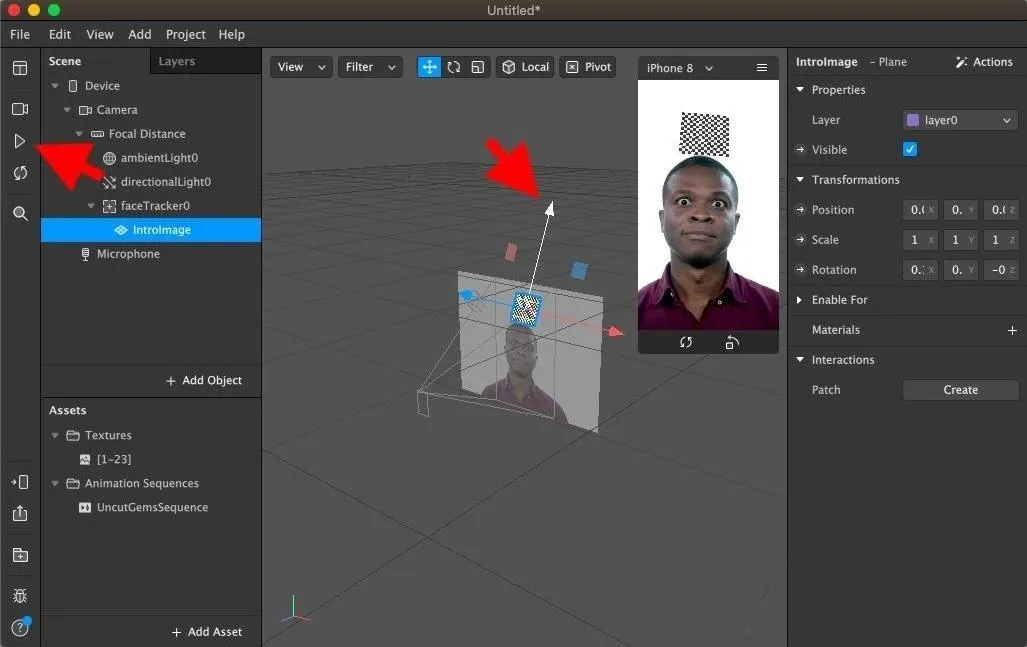
Next, you want to increase the size of the plane. First, click on the square-in-a-square button in the Viewport to edit the scale of the selected object (shown below), then click-and-hold-down on the red dot (pointing to the right) and drag it left or right to adjust the size. Use the other colored dots to change the width and length, if needed.
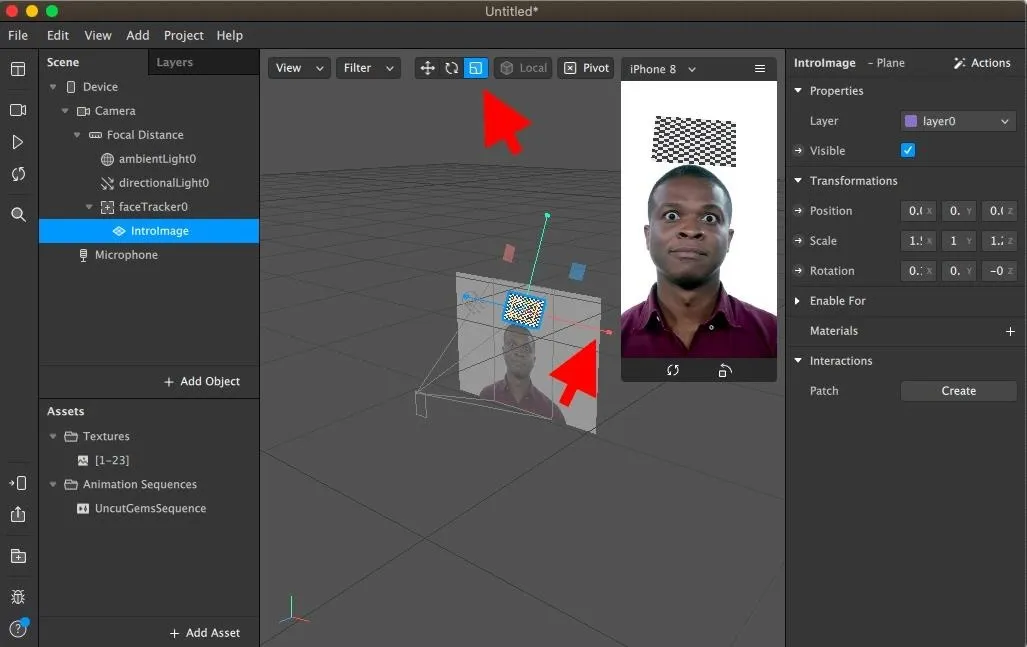
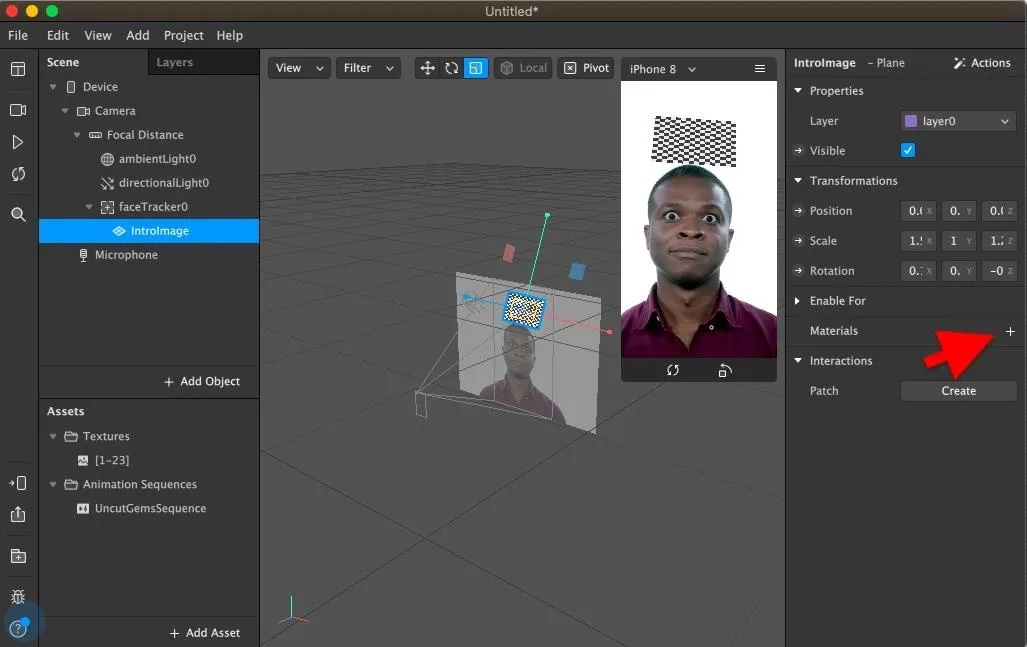
Add Material & Texture to the First Plane
In the IntroImage plane, go to the Inspector panel and click on the plus (+) sign to add a material. The material is used to determine how the surface of an object in your effect will look.
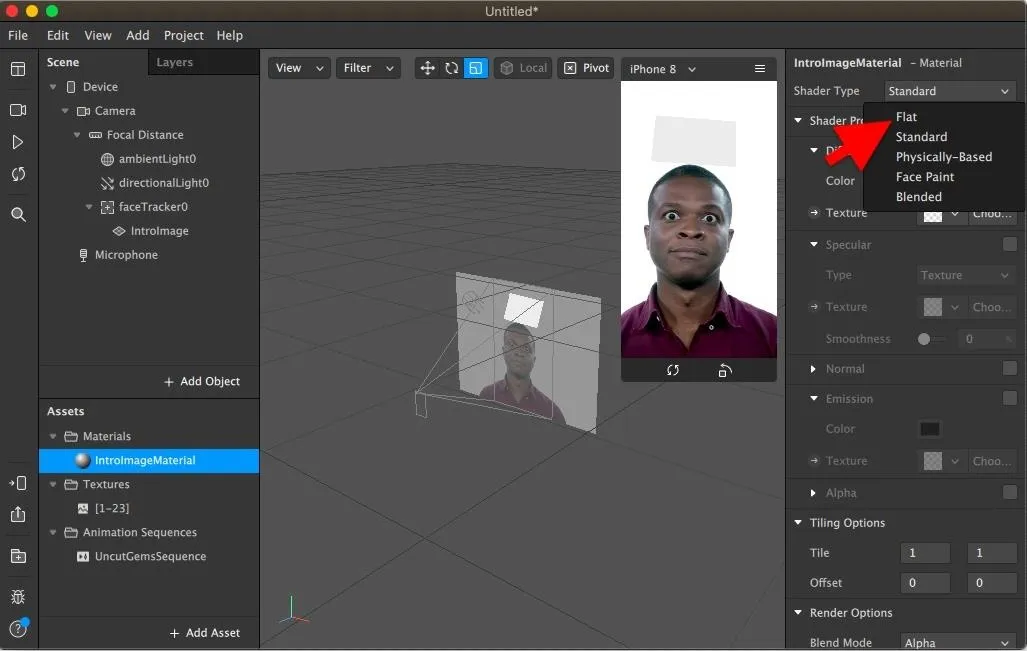
It will create a new folder in your Assets panel. Name the material "IntroImageMaterial," and in the Inspector, select "Flat" in the Shader Type drop-down menu.
In the same panel, click on "Choose File." next to Texture.
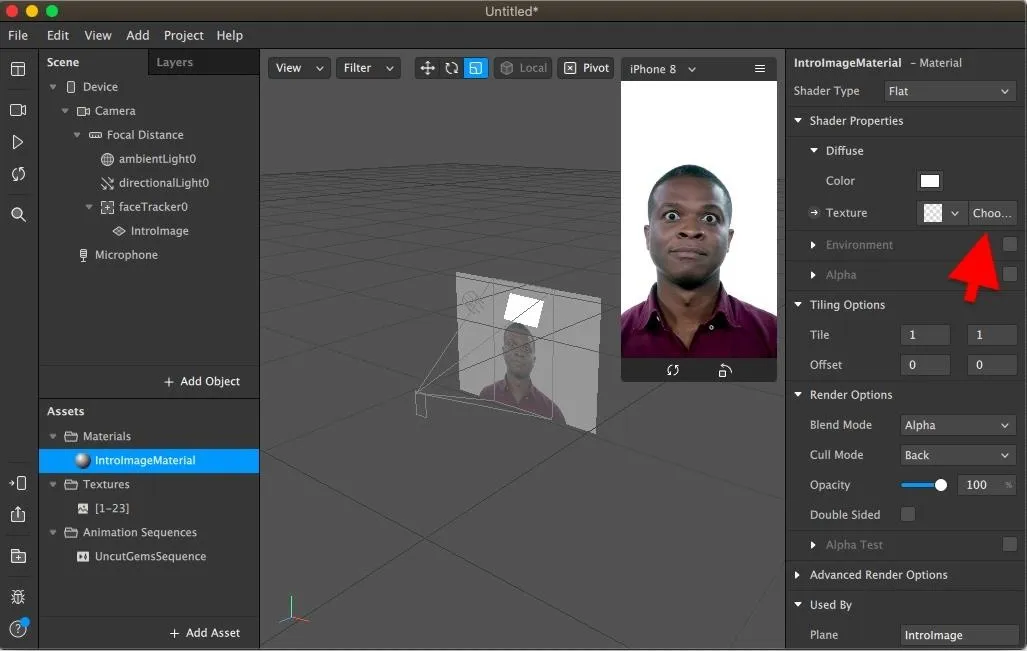
Find your intro image and click on "Open" to upload it to your project.
You can then see what the intro image will look like in the Instagram filter. You may need to hit the play button for it to appear if there's nothing showing up.
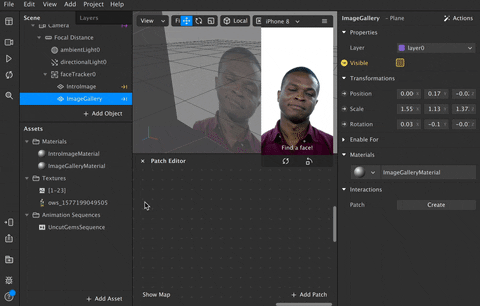
Create a Duplicate Plane & Add Material & Texture
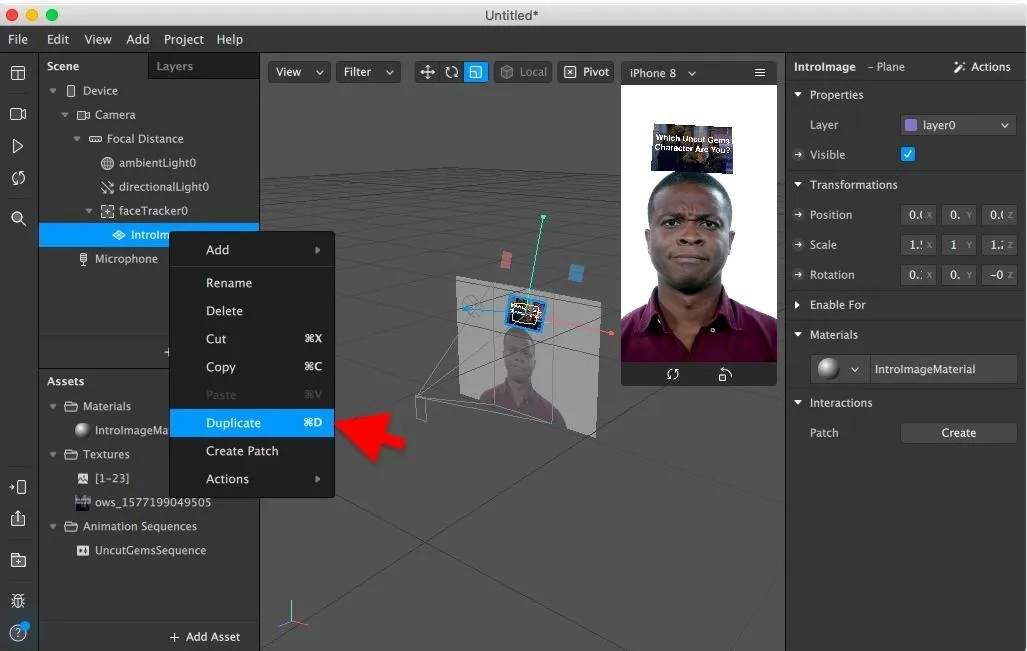
Now, you need a second plane, identical to the first, for the image gallery. Right-click on the "IntroImage" plane in the Scene panel, then click on "Duplicate."
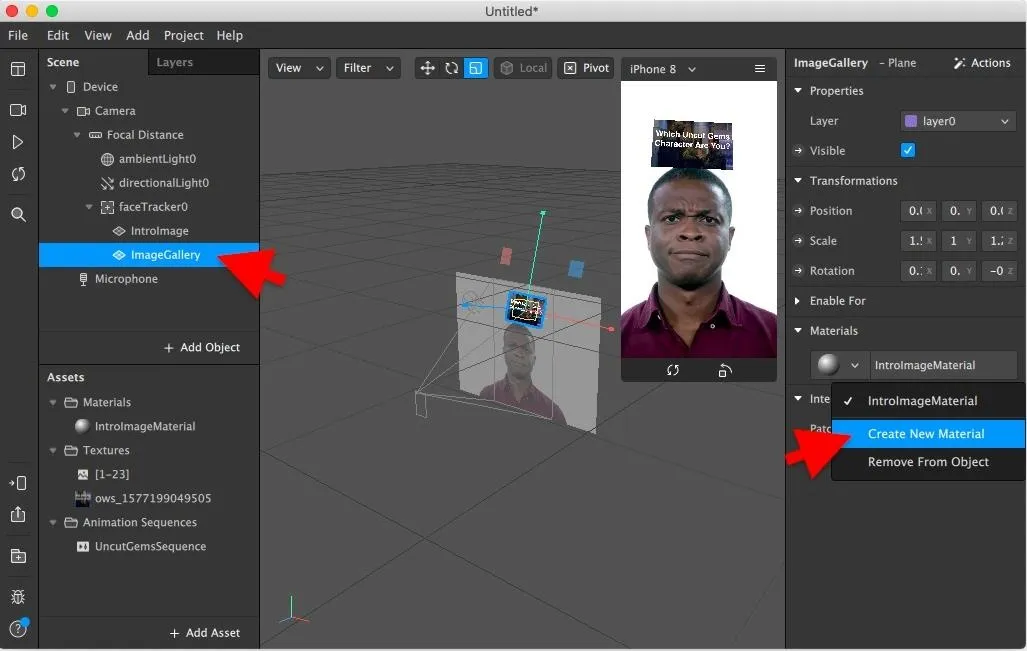
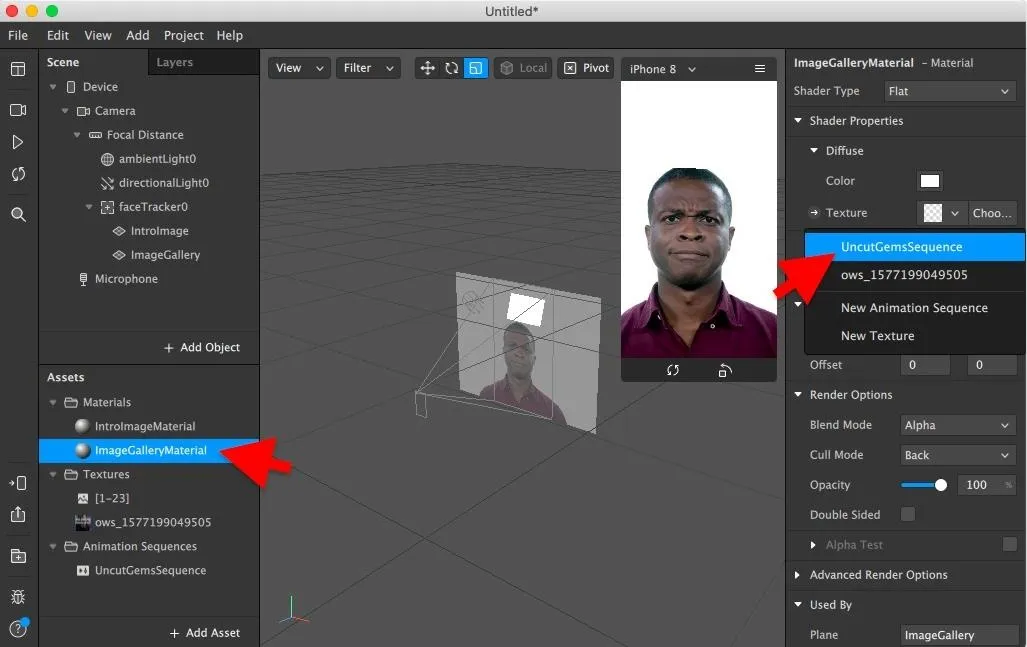
Rename the plane to "ImageGallery," then click on the circle icon under Materials in the Inspector. Click on "Create New Material."
Rename the material to "ImageGalleryMaterial," then choose "Flat" under Shader Type in the Inspector. Now you're going to add your gallery images to the filter. Next to Texture, using the drop-down menu, select the Animation Sequence you created earlier (don't click on "Choose File").
Hit the play button in the toolbar on the left to preview the random image animation.

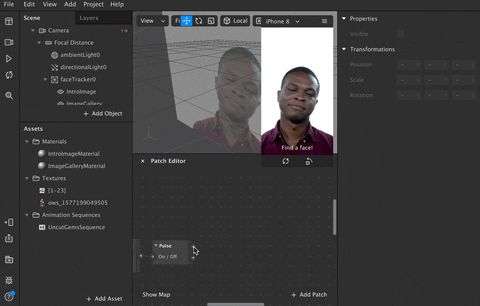
Add Patches (Controls)
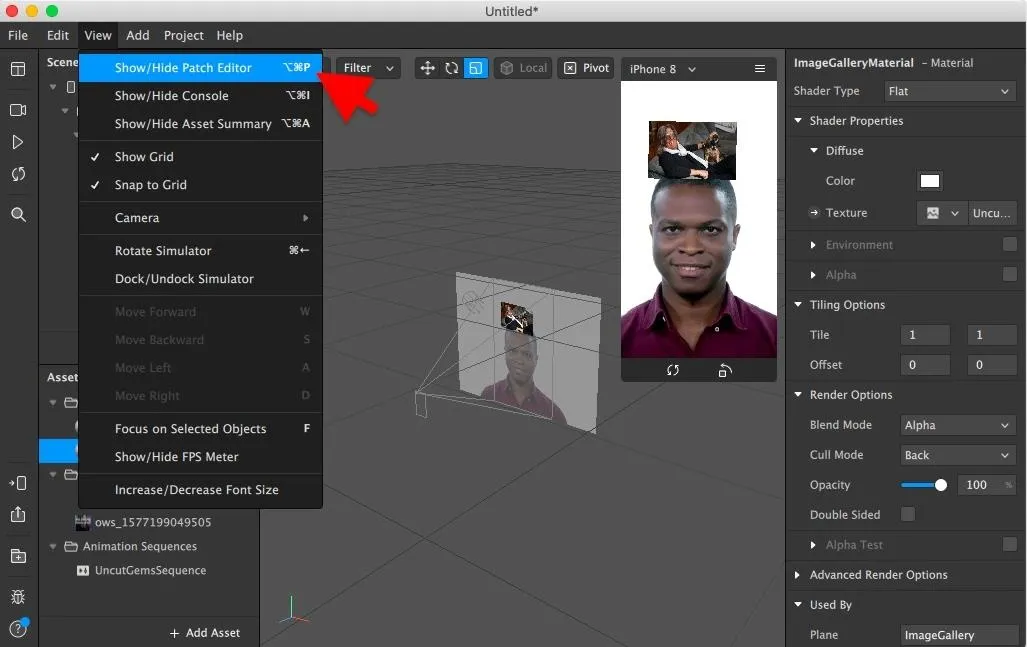
Now that we have our assets and planes, it's time to give the filter some controls. Click on "View" in the menu bar, then on "Show/Hide Patch Editor." A Patch Editor panel will appear in the bottom middle.
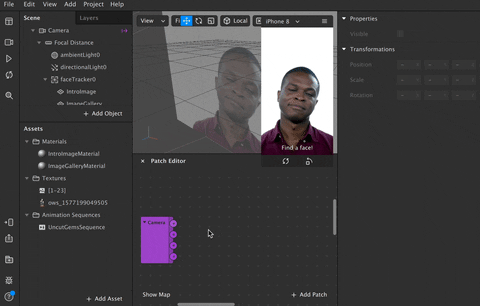
1. Create the First Patch Sequence
Now it's time to create the first patch sequence. Check out the GIFs if you have issues following along.
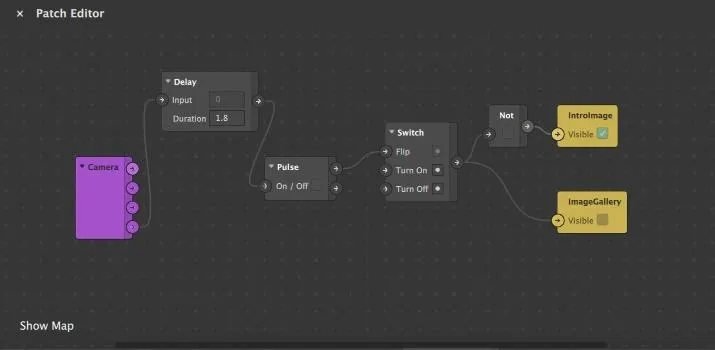
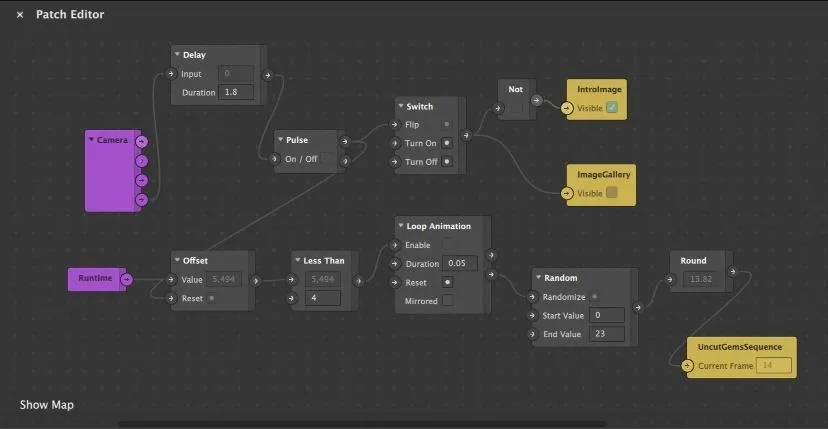
- Drag the "Camera" option from the Scene panel into the Patch Editor.
- In the Camera patch, click-and-hold on the bottom output port on the right of the patch for Video Recording, and release the connection anywhere in the Patch Editor.
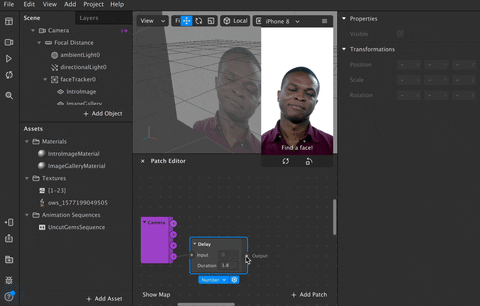
- A window will appear; search for "Delay," then hit Enter with the result selected or double-click the result to add the patch to the editor.
- In the Delay patch, enter 1.8 (seconds) into Duration, which is how long the intro image will be displayed after you start recording yourself using the filter on Instagram. Obviously, you can choose any number here.
- Click, drag, and release the Delay output port, type in "Pulse," and add it to the editor.
- Click, drag, and release the top Pulse output port (called Turned On), type "Switch," and add it to the editor. It should connect automatically to the top-left input of the Switch patch (called Flip).
- Click, drag, and release the Switch output port, type "Not," and add it to the editor.
- Click on "IntroImage" in the Scene panel, go to the Inspector panel, check the box next to "Visible" (if it's not already checked), and then hit the arrow next to it to add a property patch to the Patch Editor (you may need to click on it twice).
- Connect the Not output port to the IntroImage patch.
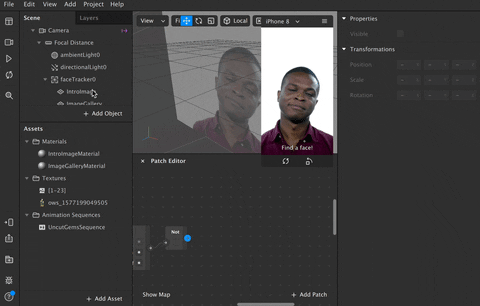
- This time, click on "ImageGallery" in the Scene panel, go to the Inspector panel, but this time make sure that the "Visible" box is unchecked. Hit the arrow next to it to add it as a patch to the Patch Editor (again, you may need to click twice).
- Connect the existing Switch patch output port to the ImageGallery patch.

The first sequence is done and should like look similar to the screenshot below.
2. Create the Second Patch Sequence
It's time to create the second patch sequence, which is independent of the first but will be connected to it in the next step.
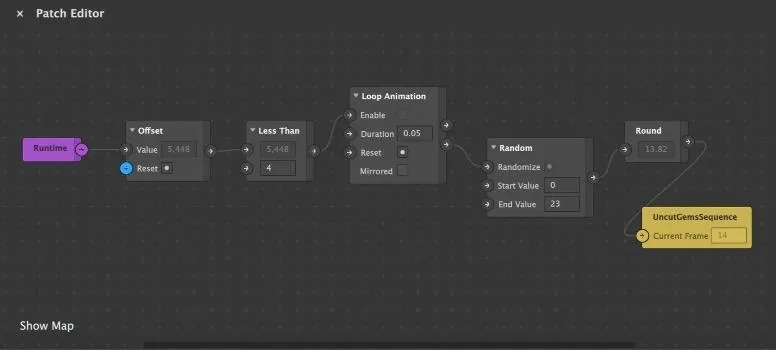
- Right-click anywhere in the Patch Editor, type "Runtime," and add it to the editor.
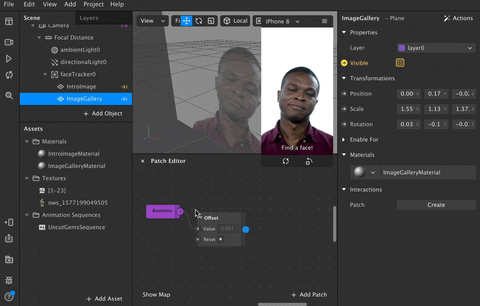
- Click, drag, and release the Runtime output port, type "Offset," and add it to the editor. Make sure it's connected to the Value input port.
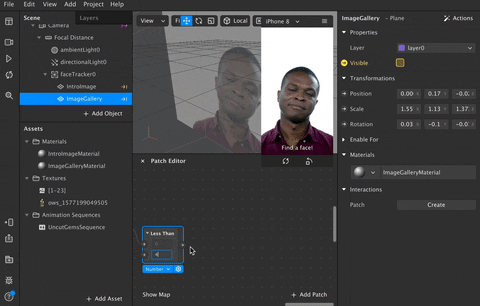
- Click, drag, and release the Offset output port, type "Less Than," and add it to the editor.
- Enter a small number into the Less Than patch, which is the amount of seconds the filter will take to pick an image. Enter "4" if you're not sure what to choose.
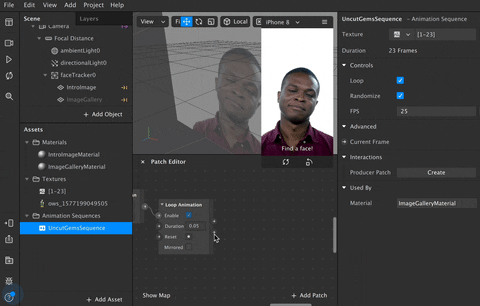
- Click, drag, and release the Less Than output port, type "Loop Animation," and add it to the editor. Make sure it connects to the Enable input port.
- For Duration in the Loop Animation patch, choose .05 so that the shuffling of the images is faster.
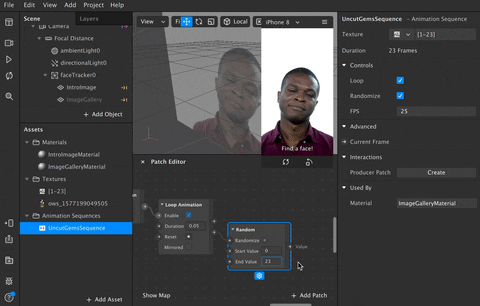
- Click, drag, and release the Looped output port on the Loop Animation patch, type "Random," and add it to the editor. Make sure it's connected to the Randomize input port.
- Under End Value in the Random patch, select the number of image assets you have, which it should say under the Textures folder in the Assets panel. My number is 23 because I uploaded 23 images for the image gallery. Leave the Start Value as 0.
- Click, drag, and release the Random output port, type "Round," and add it to the editor.
- Click on the Animation Sequence you created in the Assets panel, then click on the arrow next to Current Frame in the Inspector to add it as a patch in the Patch Editor.
- Connect the Round output port to your Animation Sequence patch input.
Your second and final sequence is done and should like look the sequence below.
3. Connect the Two Patch Sequences
Finally, you must connect the two sequences in the Patch Editor, which is easy to do. Connect the Turned On output port (top) from the Pulse patch in the first sequence to the Reset input port (bottom) in the Offset patch from the second sequence. That's it! Your sequences are now connected, and your filter is pretty much good to go.
Test the Filter Out on Instagram
To see how the filter looks on yourself, you can send it to your Instagram camera in the official Instagram app on your smartphone. Click on the "Test on device" icon in the toolbar on the bottom left, click on "Send to App," and then click on "Send" next to Instagram Camera. This will only work if your Instagram account is connected to Spark AR.
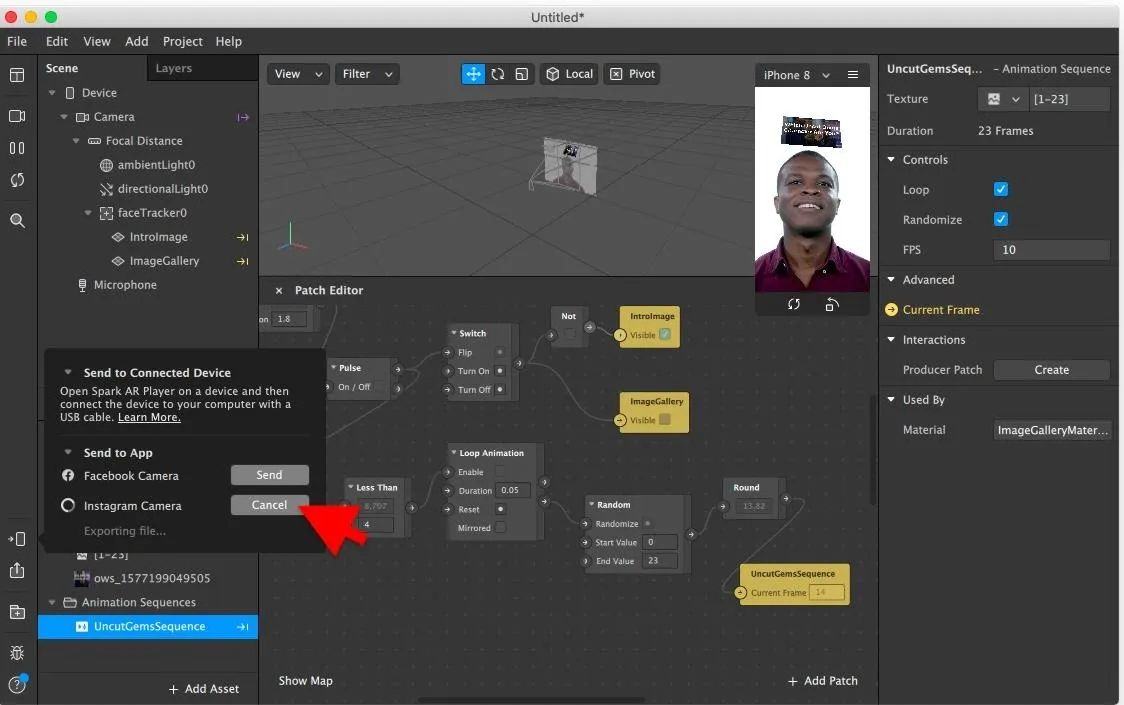
Wait a few minutes for the filter to be sent to your smartphone. On Instagram, you'll get a preview.arexport notification when the filter is sent. Tap on it, hit "Continue" on the pop-up, and you'll be able to use the filter, as well as upload it to your story.
Unfortunately, unless your filter is published, your friends won't be able to download it. However, if you have a test link, you can share it with your friends, and they'll be able to use it but not upload it to their stories. To copy the test link, click on the "Test on device" icon in the toolbar again in Spark AR Studio, click on "Copy Link" under Test Link, then share the link to whoever you want.

A Few Things You Should Know
It's important to know that this is just a simplified guide to creating a filter for Instagram. There are different ways to create the same filters, and there are a ton of other features and settings you must configure before you can send the filter out to be published by Instagram. A few things you should know:
- You can use different methods to trigger the filter (aside from video recording), such as a face movement or screen tap.
- You must upload your filter to the Spark AR Hub to publish it to Instagram for anyone on Instagram to use.
- Your filter may be too large to publish to Instagram, so you'll need to compress images, textures, and anything else that may be taking up too much room.
- There is no right way to create a filter. You can reach the same conclusion with different patches, planes, and textures.
- You can also use the Spark AR Player on iOS or Android to preview the filter.
- You can add an animation to the filter once it selects an image, which you can do with an imported animation.
Cover photo, screenshots, and GIFs by Nelson Aguilar/Gadget Hacks


Comments
Be the first, drop a comment!