


If you've taken the time to edit a video on your iPhone or Android phone, you probably have a purpose for it. Maybe you want to share it to YouTube in hopes of making the next viral sensation. Maybe you just want to save the video to your phone to show off to friends and family when you can.
Whatever you want to do with your video, you want to do something, and that requires one of two things — saving or sharing it. Which one you're looking for is up to you, but we'll cover both below.
If you haven't made a video with Adobe Premiere Clip yet, you're going to want to do that first. The easiest way to get started is by having the app edit your videos for you automatically. It's a good place to start if you're new to Adobe Premier Clip before you start getting into Freeform editing.
1. Saving a Video in Adobe Premiere Clip
Premiere Clip automatically saves your projects in your Creative Cloud account, but to get the finished video file, you'll want to save it. Saving a video is easy, no matter if you have an iPhone or an Android device. And there are actually a few places you can save it — either on your device, to Dropbox, or in the Creative Cloud. Files saved using the below steps will create an MP4 file.
Saving to Your Phone's Storage
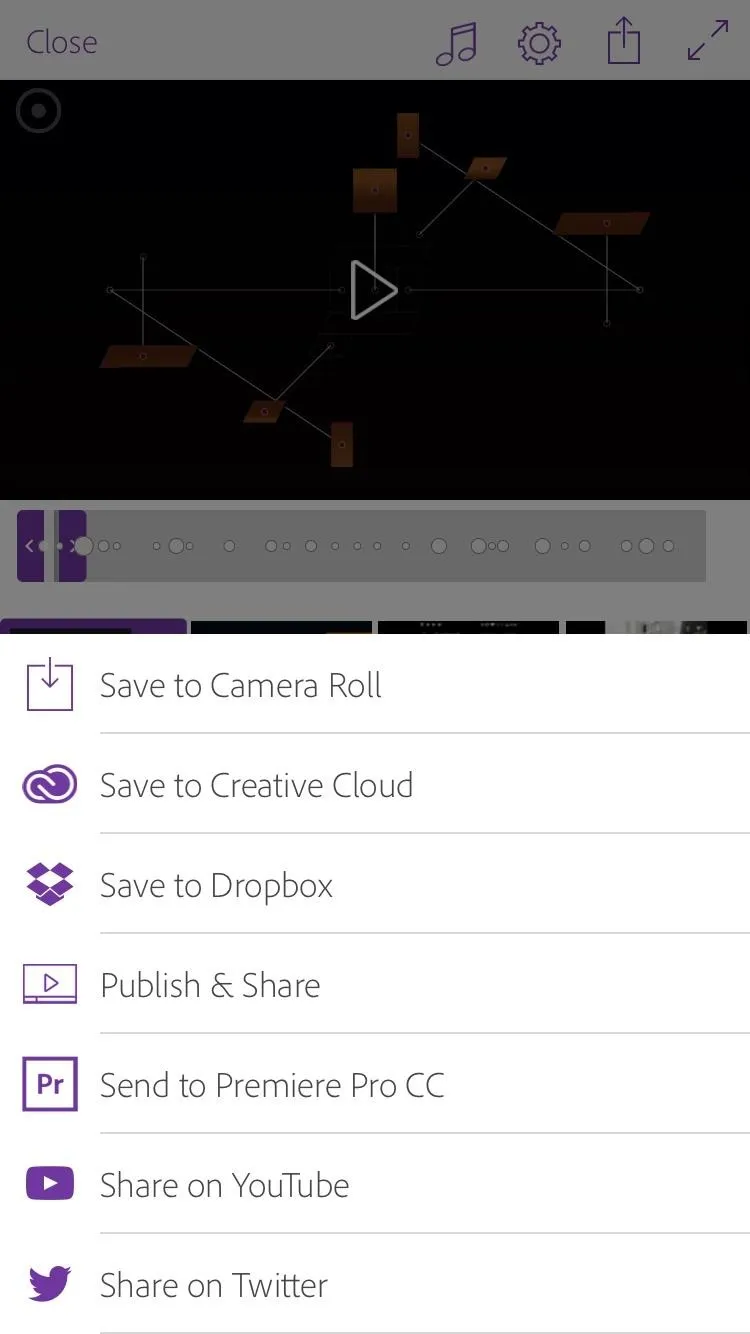
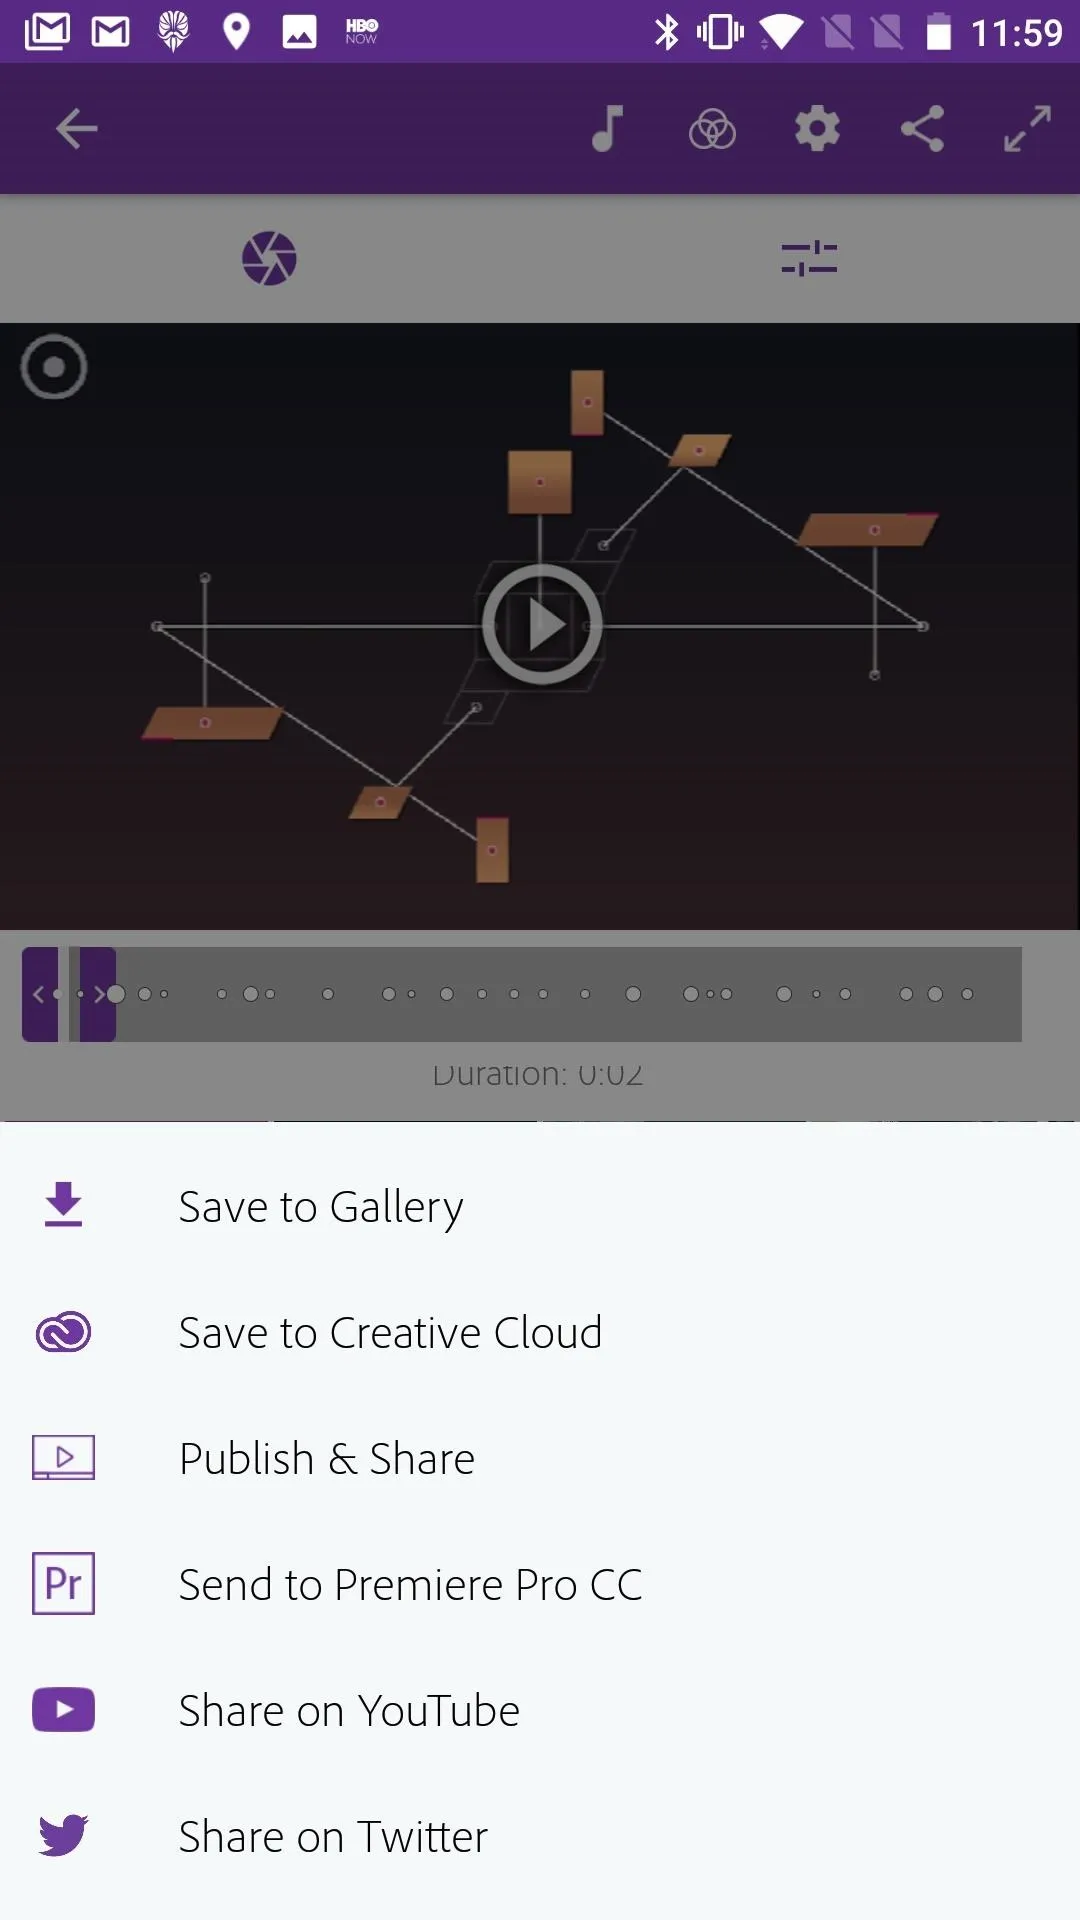
- Tap the share button in the top-right corner of the display.
- Tap "Save to Camera Roll" (iOS) or "Save to Gallery" (Android), if saving to your storage. Otherwise, select "Dropbox."
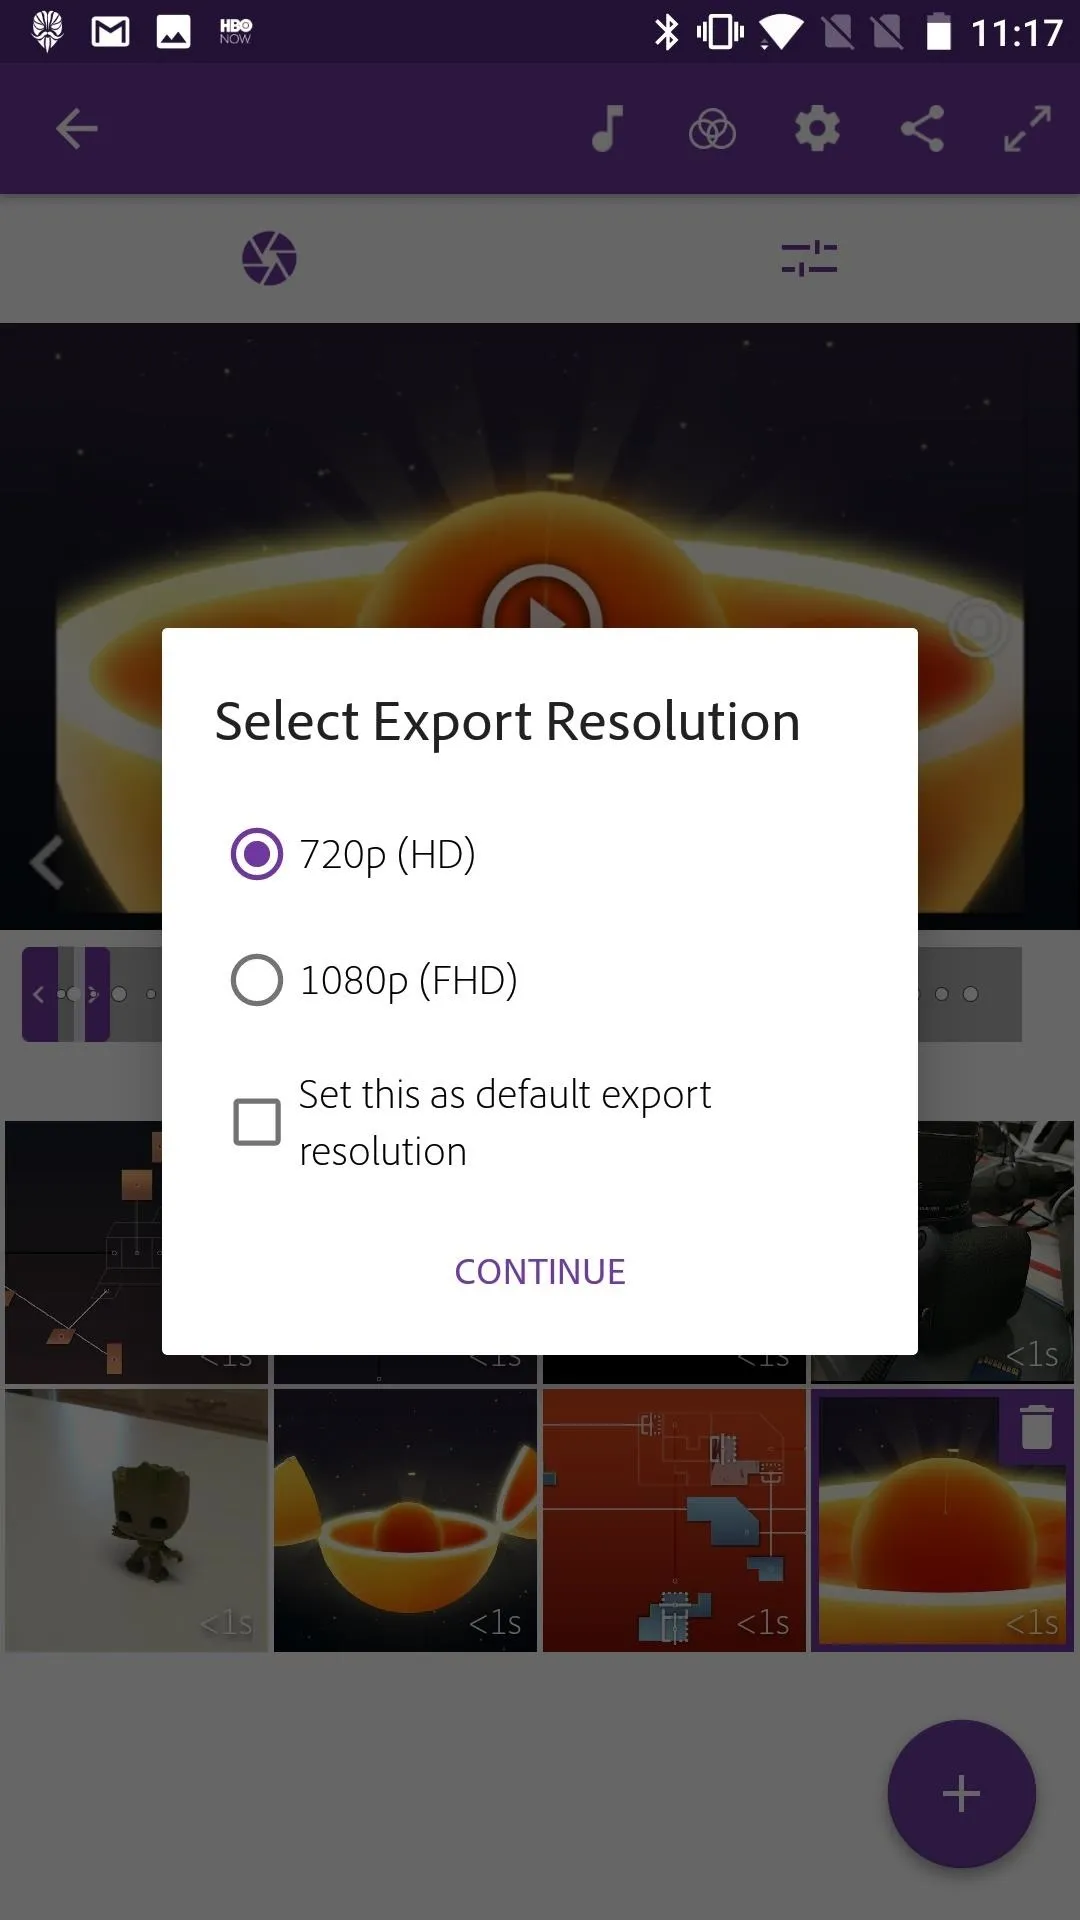
- Choose your preferred resolution, followed by "Continue." (Android only.)
- The video will be saved to your phone's storage, and you will find it in the Videos folder of your phone's photos app, or to your Drop
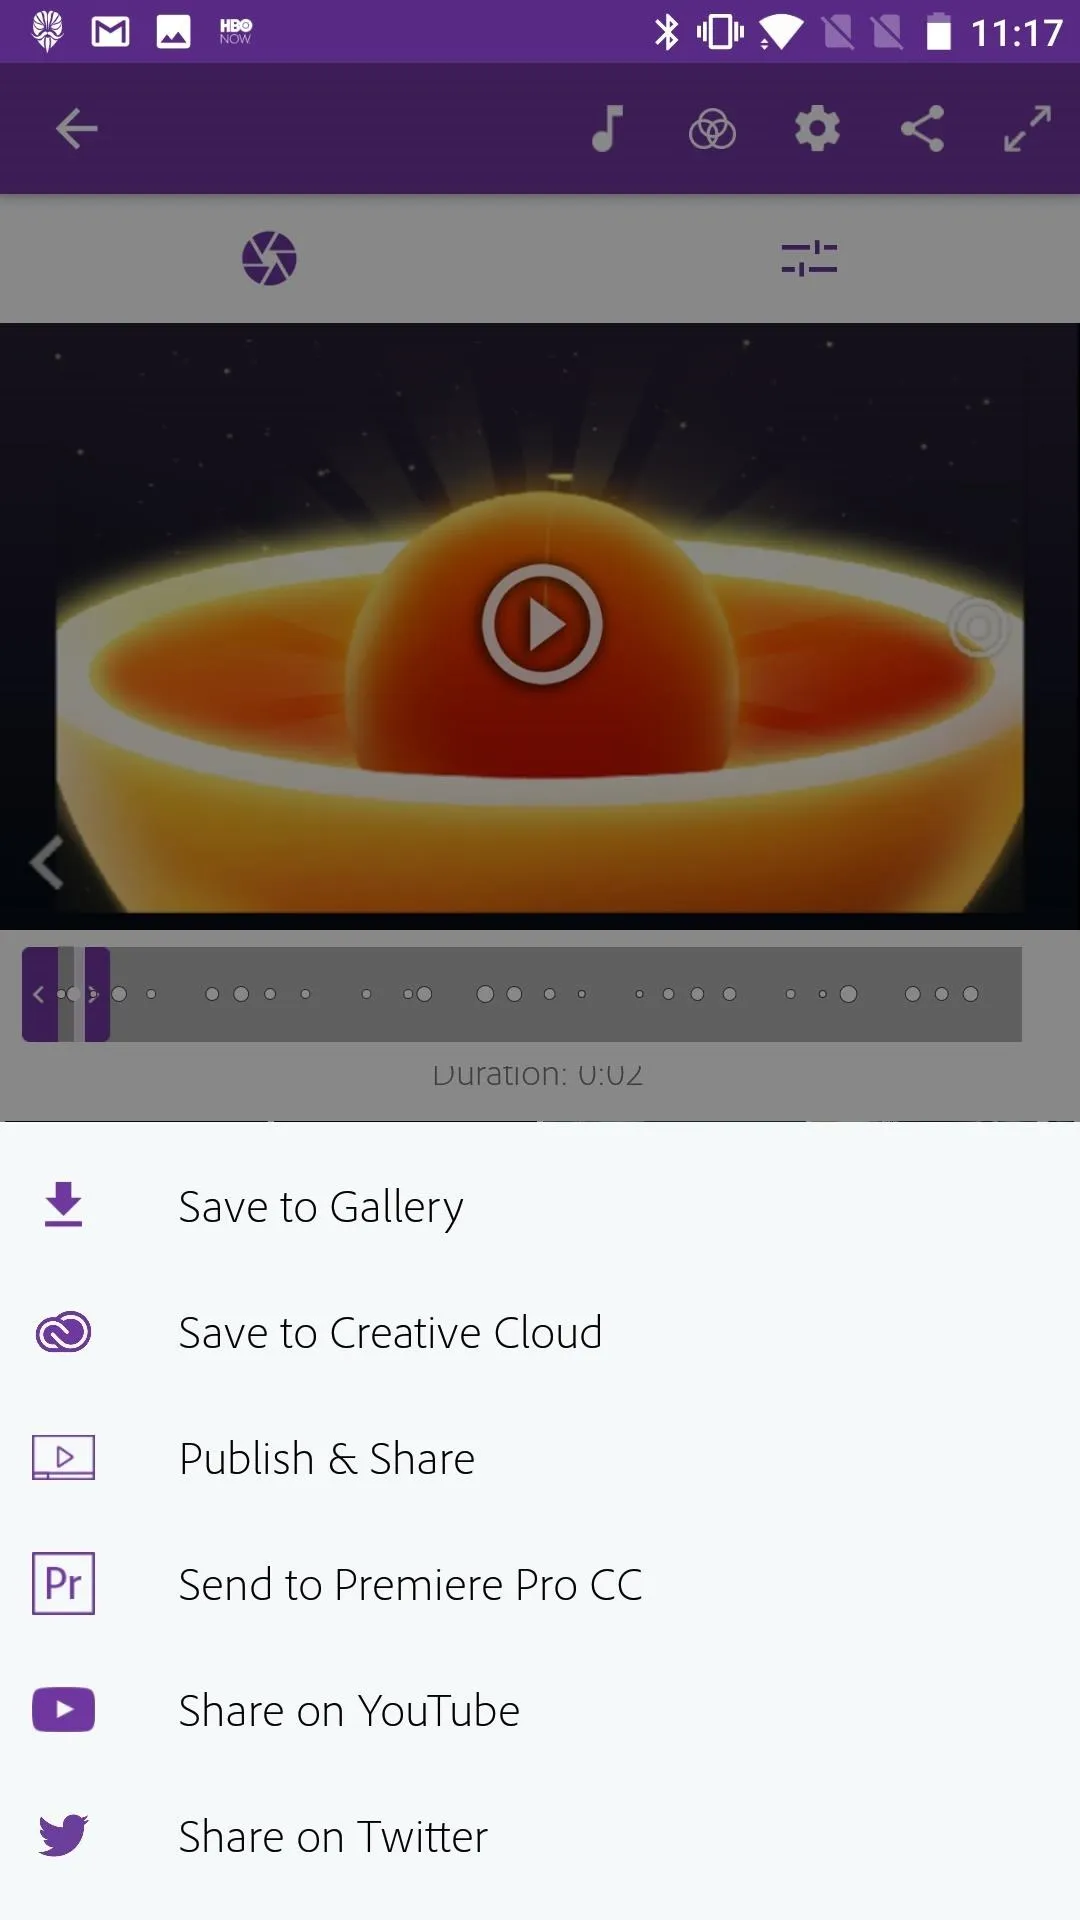
Saving to an Android phone.
Saving to an Android phone.
Saving to Dropbox (iPhone Only)
- Tap the share button in the top-right corner of the display.
- Tap "Save to Dropbox." (You may be prompted to link your Dropbox account at this point before continuing, if you haven't already.)
- Pick the Dropbox folder you would like to save it in.
- Tap on "Choose this folder" and it will be saved there.

Saving from an iPhone to Dropbox.
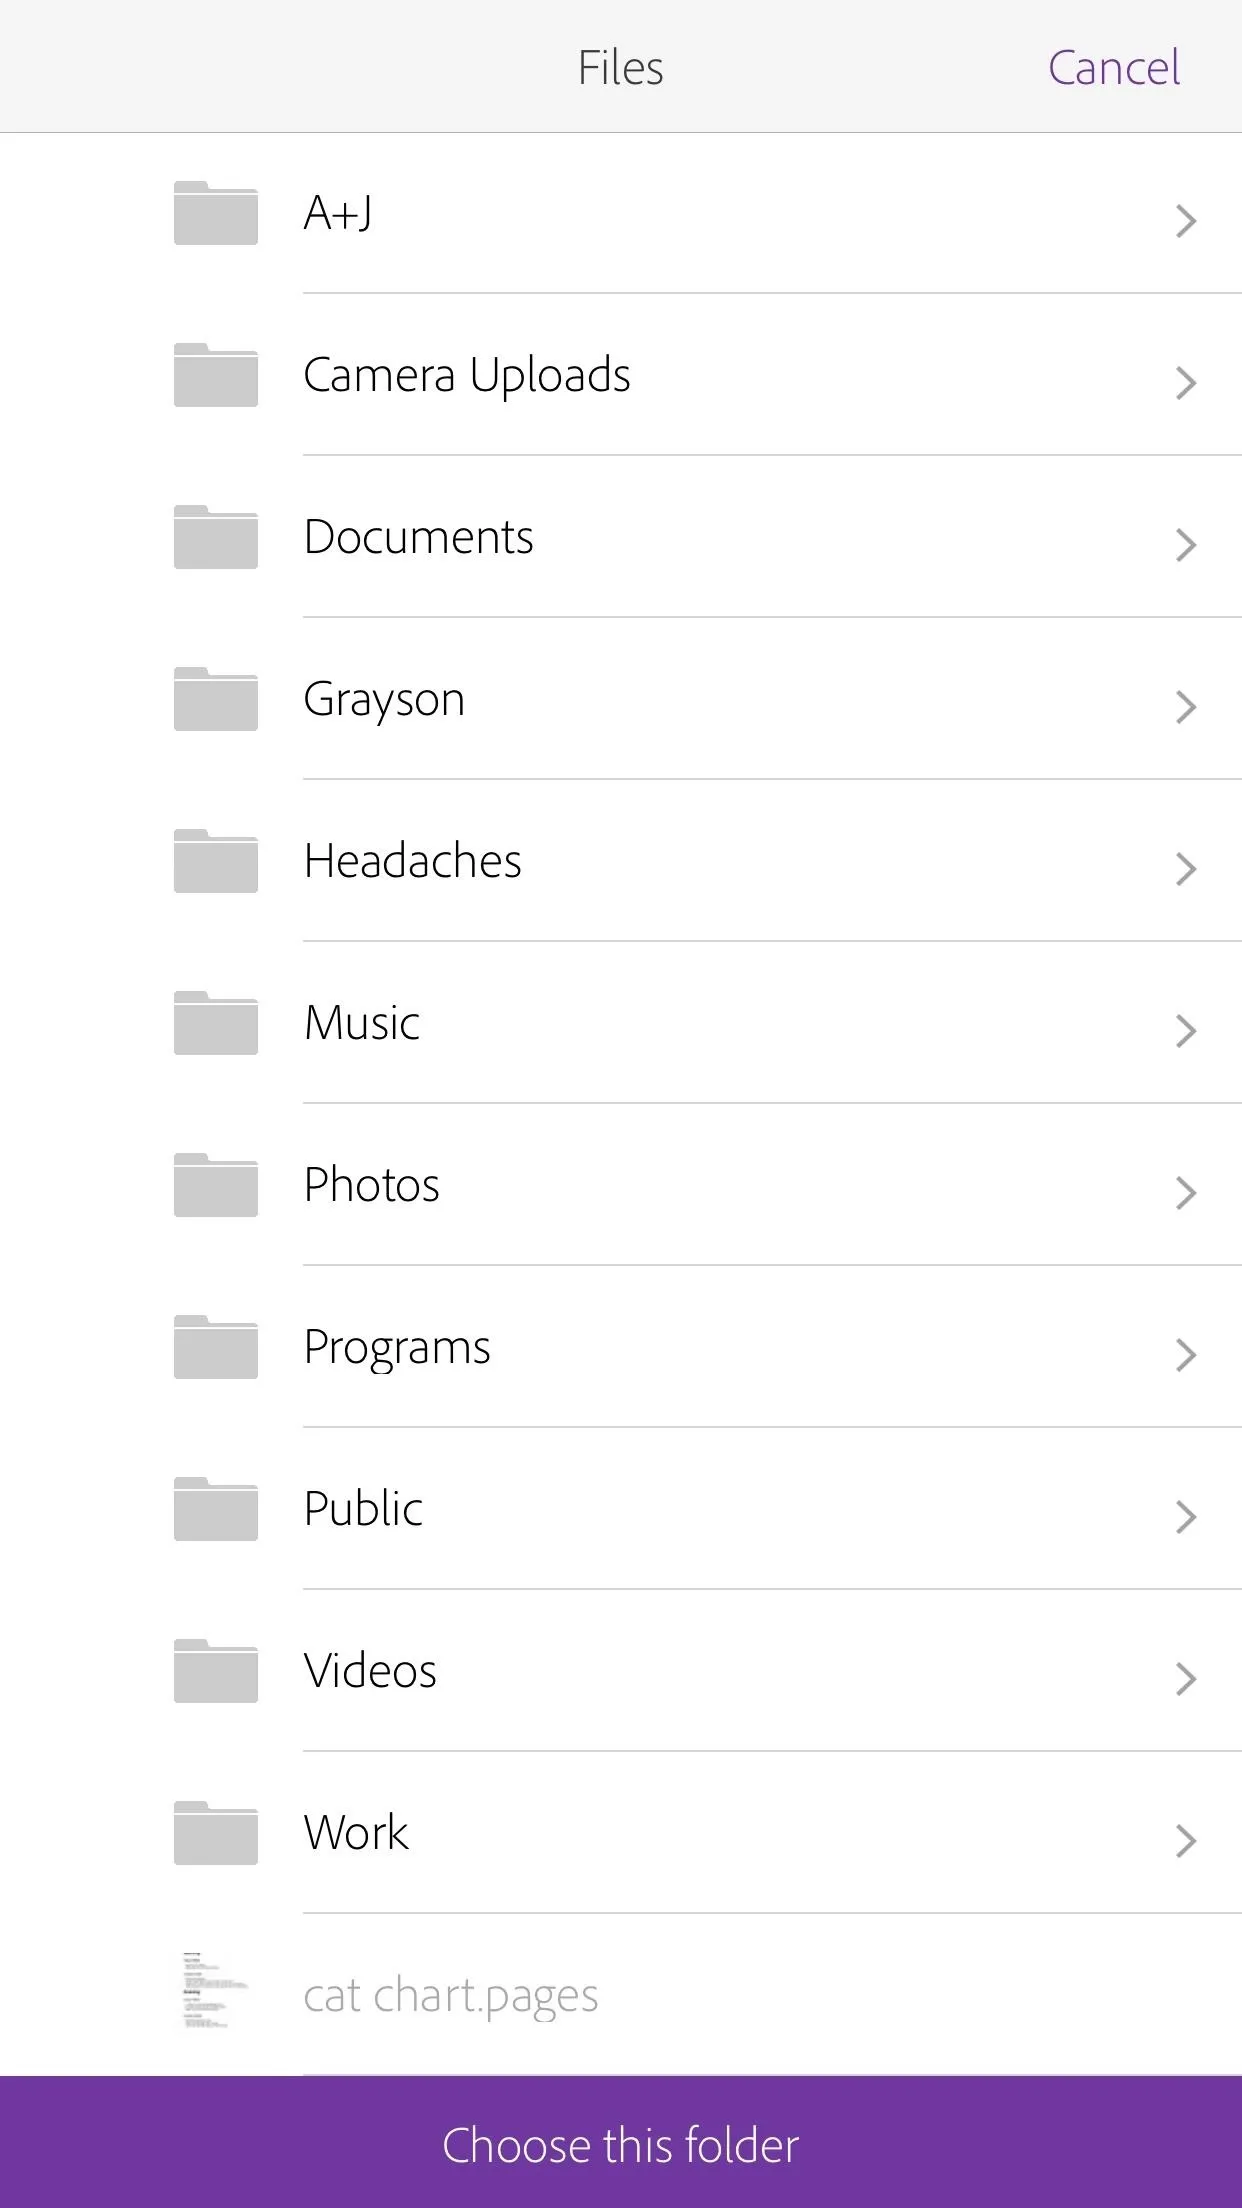
Saving from an iPhone to Dropbox.
Saving to Creative Cloud
You can store your videos in Adobe's Creative Cloud service, even if you don't have a membership. By using the app, Adobe either had you log in or create an Adobe account, so you have access to the Cloud. With a free membership, you get 2 GB of space at no cost. You can access these files from other Creative Cloud apps, the Adobe Creative Cloud app for iOS or Android, or from "My Assets" online. If you're using the iOS app, you can upgrade to 22 GB of storage for $1.99 every month.
- Tap the share button in the top-right corner of the display.
- Tap "Save to Creative Cloud."
- Choose your preferred resolution, followed by "Continue." (Android only.)

Saving from an Android phone to Creative Cloud.
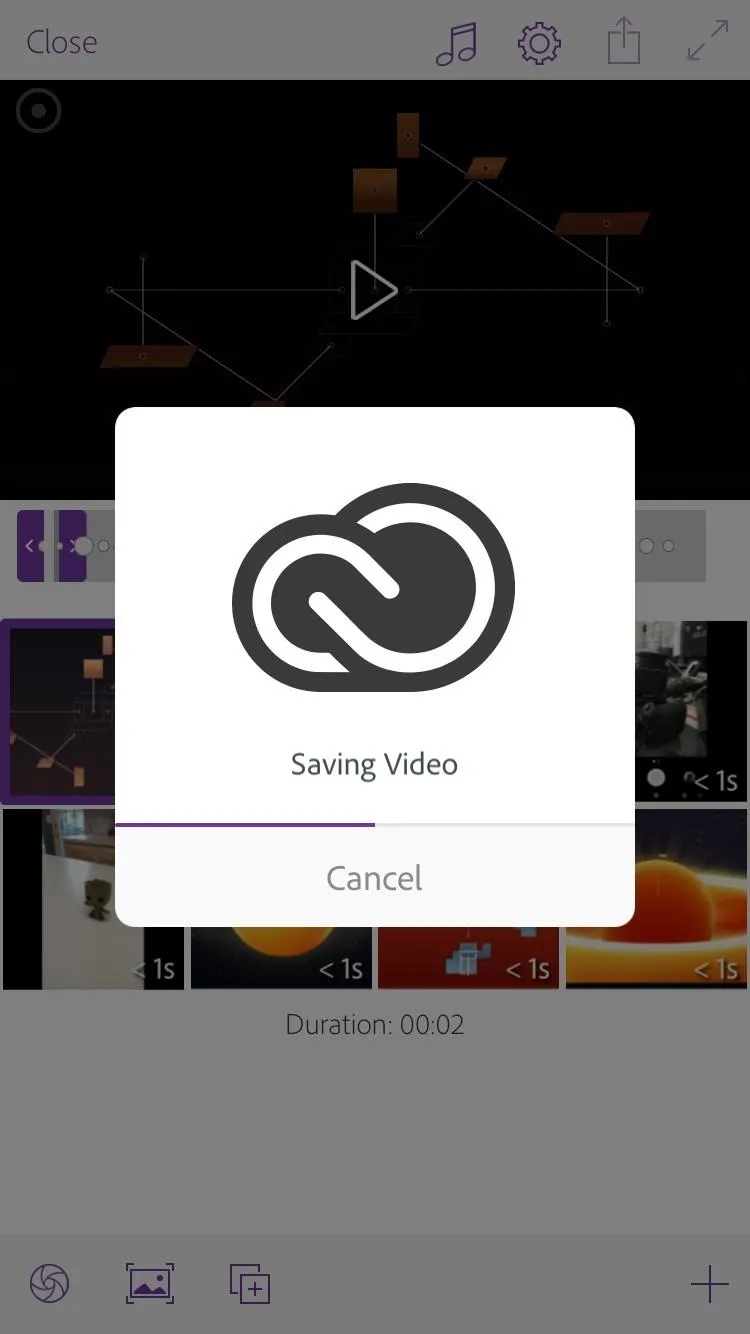
Saving from an Android phone to Creative Cloud.
2. Sharing a Video from Adobe Premiere Clip
Adobe Premiere Clip gives you more options for sharing videos than saving them, which makes sense. Saving a video is usually for your own personal use, while there is a multitude of platforms that lend themselves to sharing videos, including Twitter, YouTube, and even Adobe's own Creative Cloud community network.
Sharing to Adobe's Network
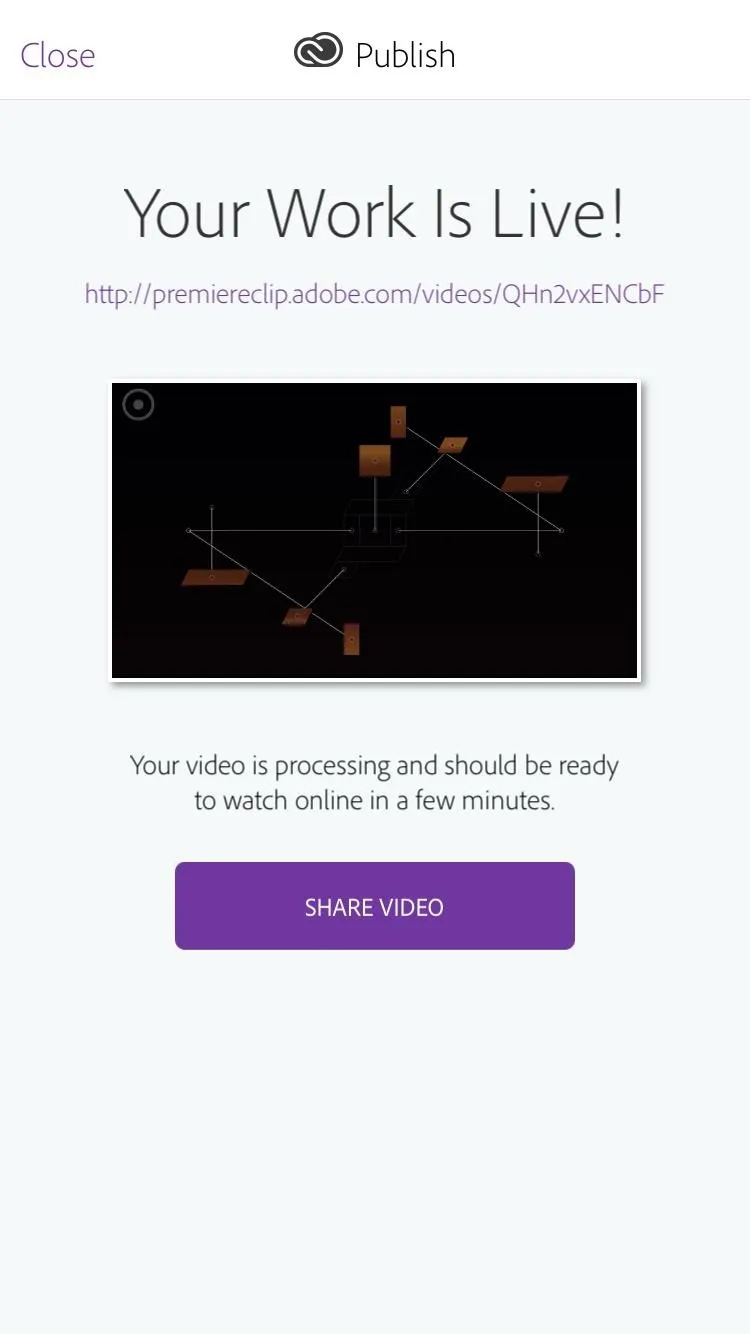
Adobe has its own location for users to upload videos to. Here, Adobe users can share their videos, as well as browse other users' content. To share your video to Adobe's public network:
- Tap the share button in the top-right corner of the display.
- Tap "Publish & Share."
- Choose your preferred resolution, followed by "Continue." (Android only.)
- You can edit the title by tapping on the box next to the video's thumbnail.
- Choose your privacy setting. "Public" will allow anyone to view your video, while "Unlisted" will only allow users with the link to view your video.
- Tap "Publish."
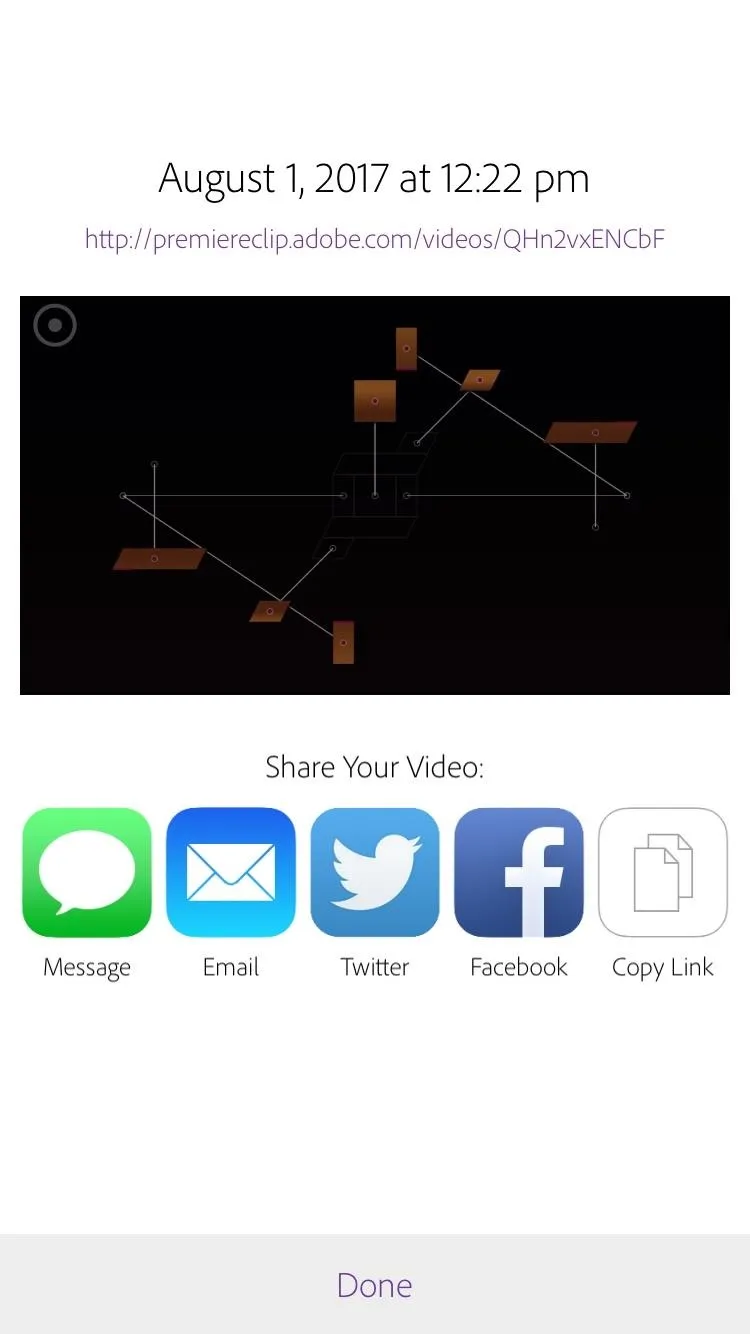
Once the video has finished uploading, you will have the option to share it on other platforms such as social media, email, or messages. Tap any one of these to share the link.
Sharing to YouTube
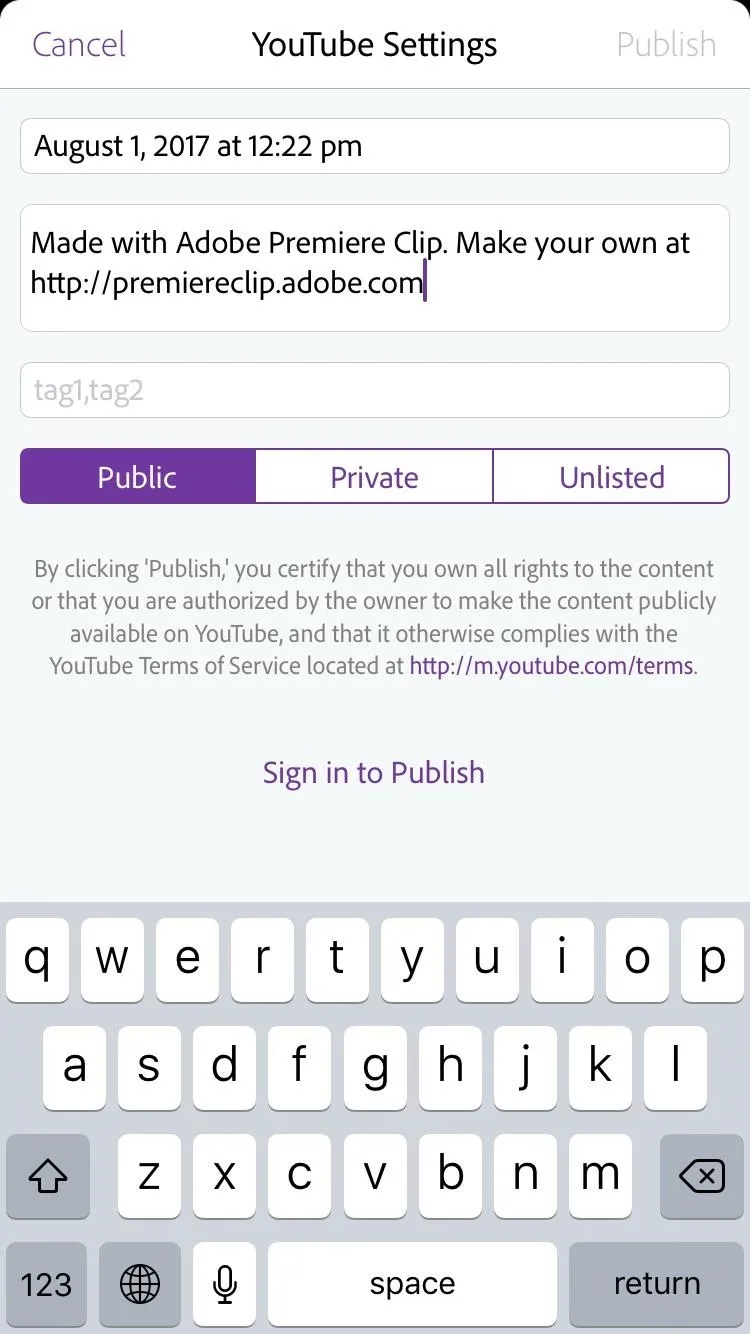
You can upload your Adobe Premiere Clip video directly to your YouTube channel, bridging the gap between smartphones and computers. To share your video to YouTube:
- Tap the share button in the top-right corner of the display.
- Tap "Share on YouTube."
- Choose your preferred resolution, followed by "Continue." (Android only.)
- If on Android, you will be prompted to sign in to your YouTube (Google) account. If you are on iOS, you won't be prompted, but you can tap "Sign in to Publish" at the bottom of the display to sign in.
- Tap on the title box to edit your title.
- Tap on the box below to edit the video description. There will be one there automatically that promotes Adobe's app, so you'll probably want to change it.
- Choose your privacy setting. "Public" will allow anyone on YouTube to view your video. "Private" will only let people you authorize view your video. Finally, "Unlisted" will allow anyone with the link to view your video.
- Tap "Publish."
- If prompted, tap "Allow" to allow Premiere Clip to manage your YouTube videos.
Sharing to Twitter
You could always upload the video to Adobe, then share the link on Twitter. But with this new method, you will be able to upload the video itself directly to your Twitter account. To share your video directly to Twitter:
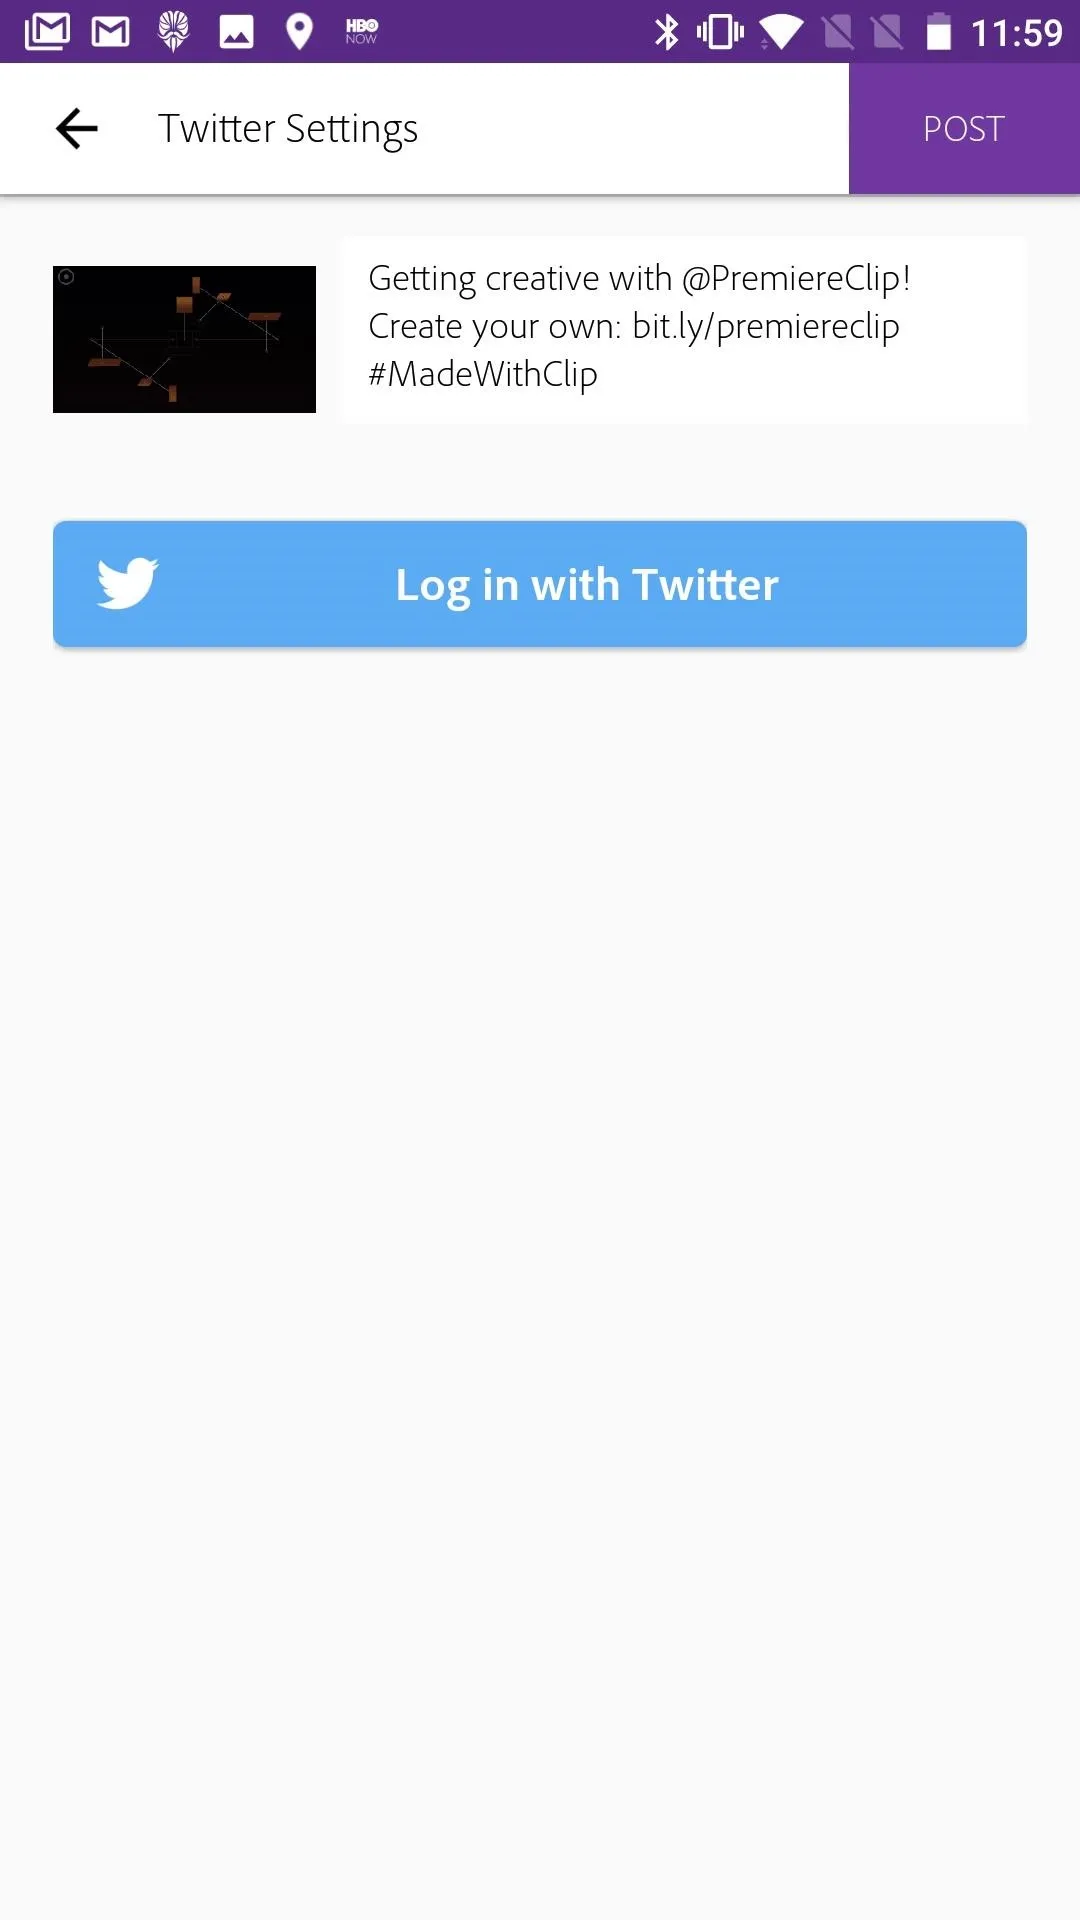
- Tap the share button in the top-right corner of the display.
- Tap "Share on Twitter."
- Choose your preferred resolution, followed by "Continue." (Android only.)
- Tap "Log in with Twitter" if you haven't connected your Twitter account yet. Adobe won't prompt you to log in like it does with YouTube, so you have to do this yourself.
- Edit your Tweet by tapping the box next to your video's thumbnail. Remember, keep it 140 characters or under!
- Tap "Post."
That's all there is to saving and sharing with Adobe Premiere Clip. All that hard work you put into your video has paid off — you can now share your masterpiece with anyone you want, or just know that it's secure on your device or in the cloud.
- Follow Gadget Hacks on Facebook, Twitter, Google+, YouTube, and Instagram
- Follow WonderHowTo on Facebook, Twitter, Pinterest, and Google+
Cover image and screenshots by Jake Peterson/Gadget Hacks


Comments
Be the first, drop a comment!