

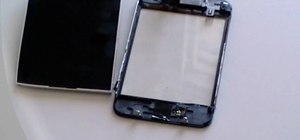
In this how to video, you will learn how to replace the glass digitizer on your iPhone 3G. First, remove the two screws at the bottom and the SIM card at the top. Once these are removed, use the safe pry tool and run it at the bottom between the bezel and back cover. Slowly remove the cover. Pop out the three connecters at the top of the inside. The third connector is in a jaw connected. Place the pry tool in a 90 degree angle to remove it. Now that the connectors have been opened, carefully remove the digitizer glass. To access the LCD, remove the screws on the side. Now you should remove the metal frame with a flat head screwdriver. Once this has been done, slide it out from the bottom. Use a heat gun to warm the glue in order to separate the digitizer and mid section. Once the glue has been heated, pry off the digitizer from the plastic mid section. Remove any excess glue. You have now removed the glass digitizer, allowing you to replace the component.
Just updated your iPhone? You'll find new emoji, enhanced security, podcast transcripts, Apple Cash virtual numbers, and other useful features. There are even new additions hidden within Safari. Find out what's new and changed on your iPhone with the iOS 17.4 update.


Be the First to Comment
Share Your Thoughts